Draw a diagram of your preferred workflow and explain why you take certain steps
Create a checklist for your workflow
Take a screenshot of your folder structure
Explain why creating backups are so important
Complete the Exercise Files from Photoshop 2021 Essential Training: The Basics by Julianne Kost
DIAGRAM
CHECKLIST
Set up the camera (format, white balance, ISO, mode…)
Delete bad shots after the photoshoot
Import photos to computer
Second back-up to external hard drive if necessary
Organise photos in folders
Review and pick best shots
Import to Lightroom and enhance photos
Save as JPEG (web) or TIFF/PDF (print)
Export photos to an external hard drive
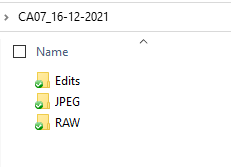
FOLDER STRUCTURE
My folder structure looks like this. I create a folder with the name of the photoshoot (in this case CA07, as it was for that assignment) followed by the date it took place, so I know right away when the pictures were taken. Inside that, I separate my photos per format and put them in a different subfolder. The edited photographs are exported to the Edits folder.
BACK-UPS
Backing up your photos is vital since digital data can be lost quite easily due to loss/theft of a camera, accidentally deleting images, corruption of cards, etc. It will prevent you from losing hours of hard work and, save you from the situation to have to tell your client that you have lost everything, especially if it is a one-time event such as a wedding. You should back your photographs up as soon as possible in at least 2 different locations.
Photoshop 2021 Essential Training: The Basics
I had completed most of the 2020 version of the same tutorial during GRA1, so I rewatched what I felt needed refreshing and finished the unwatched videos. I compared the contents of both tutorials and they are almost identical. Here is the Certificate of Completion.
In your own words, describe the procedure of planning a fashion shoot. You don’t need to go into too much detail, a short outline will do.
The first thing to consider is the concept or theme of the photoshoot. This will affect all your other choices such as make-up, styling and location. The next step is to create one or multiple mood boards to collect your ideas and inspiration. Mood boards also help the client and the rest of the team to understand the concept you have in mind for the session. Then you create a storyboard: a few rough sketches showing the angle and the length that you will be shooting at. A storyboard is a critical tool for communicating your vision to the other members of your team. If you are going to shoot in a studio, you need to book it. If you are shooting outdoors, you need to find a location, take a few test shots and find interesting lines and textures that will enhance your pictures. Apply for permissions if necessary. A shortlist is a list that organises your day and helps you not to forget important details, and determines the equipment you will need on the day. Then, you need to choose a model who suits the brand and concept. Appoint a stylist, a hair and make-up artist.
What are the stylist’s duties?
A stylist will find suitable clothing and accessories, make sure that all the costumes arrive at the shoot on time and that everything fits and co-ordinate costume changes.
List your duties as photographer
One of the photographer’s duties is to book a studio and equipment if required and get the necessary permissions. Book the model and the crew: the make-up artist, hairstylist and your assistant. Provide food and water for the day, so hire a catering company for big shoots or send the assistant to buy some snacks if it’s a low-budget shoot. Music can sometimes help set the mood, so it’s a good idea to bring speakers to connect to your computer. Work out a detailed shoot day schedule and send it to the team in advance. The photographer must be able to direct the model to get the best look or pose. Finally, keep the crew informed of the schedule and gently push them to finish their tasks on time. It’s the photographer’s responsibility to keep the shoot progressing in an orderly manner.
What equipment would you take along on the Alice in Wonderland shoot that was featured in this module?
Wide angle, macro and 50 mm lenses Camera body Memory cards Battery chargers Extra battery Extra camera Light set Diffuse boxes Flash Reflector
Find an editorial fashion spread in a fashion magazine. Explain what you think the concept was, what equipment they used and how the location affected the concept. Scan or photograph the shoot and hand it in along with your answer.
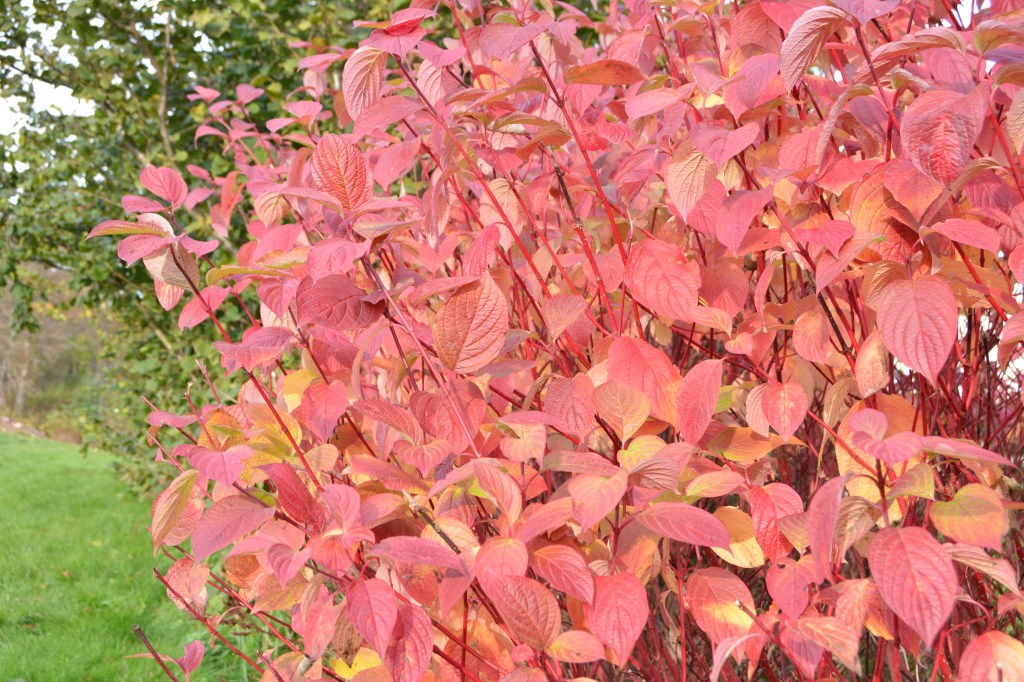
This is a spread I found on the Internet. The concept is elegant, sensual and glamourous. The B&W photo, the model pose, her air-brushed skin and flawless make-up, and the big jewellery add to the theme. The photo seems to be taken indoors, although it is not clear where, it could be in a studio. The shot shows the model leaning against the wall. Her face and body are lightened (possibly using a soft box) while her dark hair blends with the black background.
Question 2 – Practical assignment
Watch the tutorial on LinkedIn Learning Douglas Kirkland on Photography: Editorial Assignment
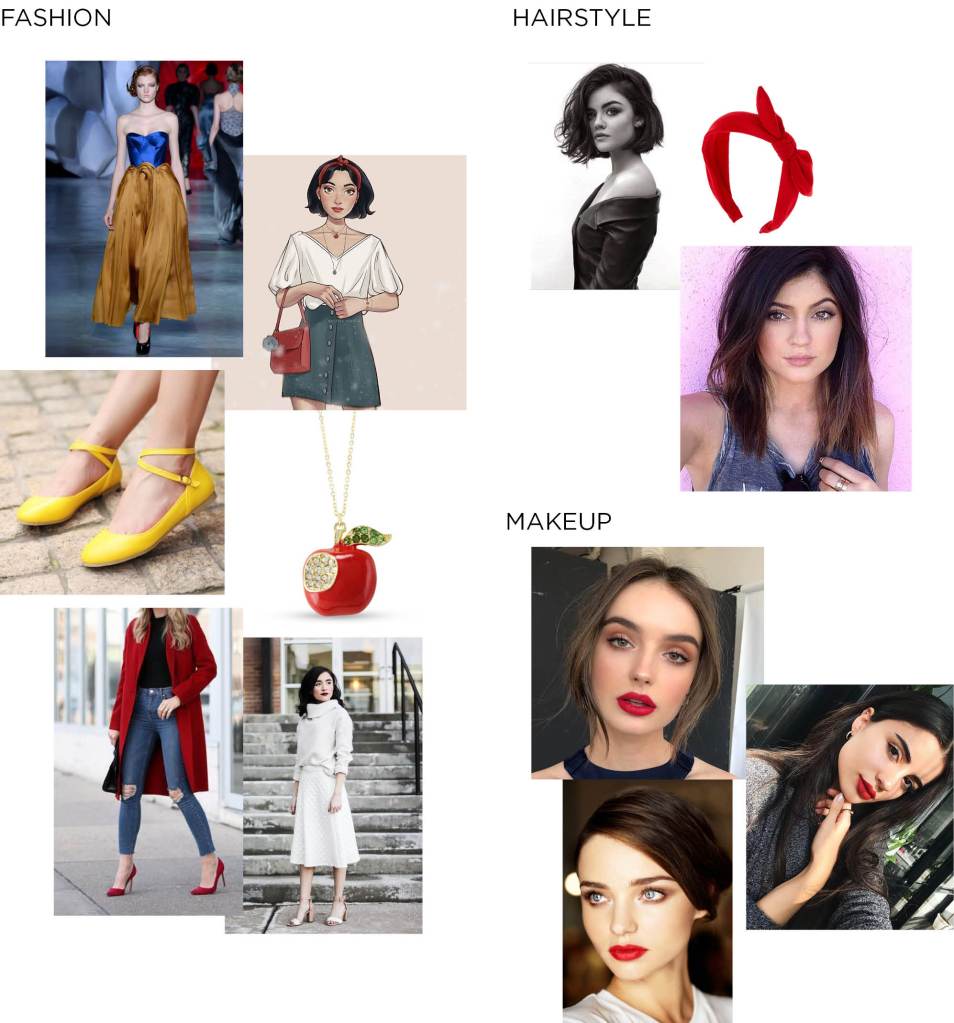
Plan a Snow White themed fashion shoot
Create a mood board for hair, make-up and fashion
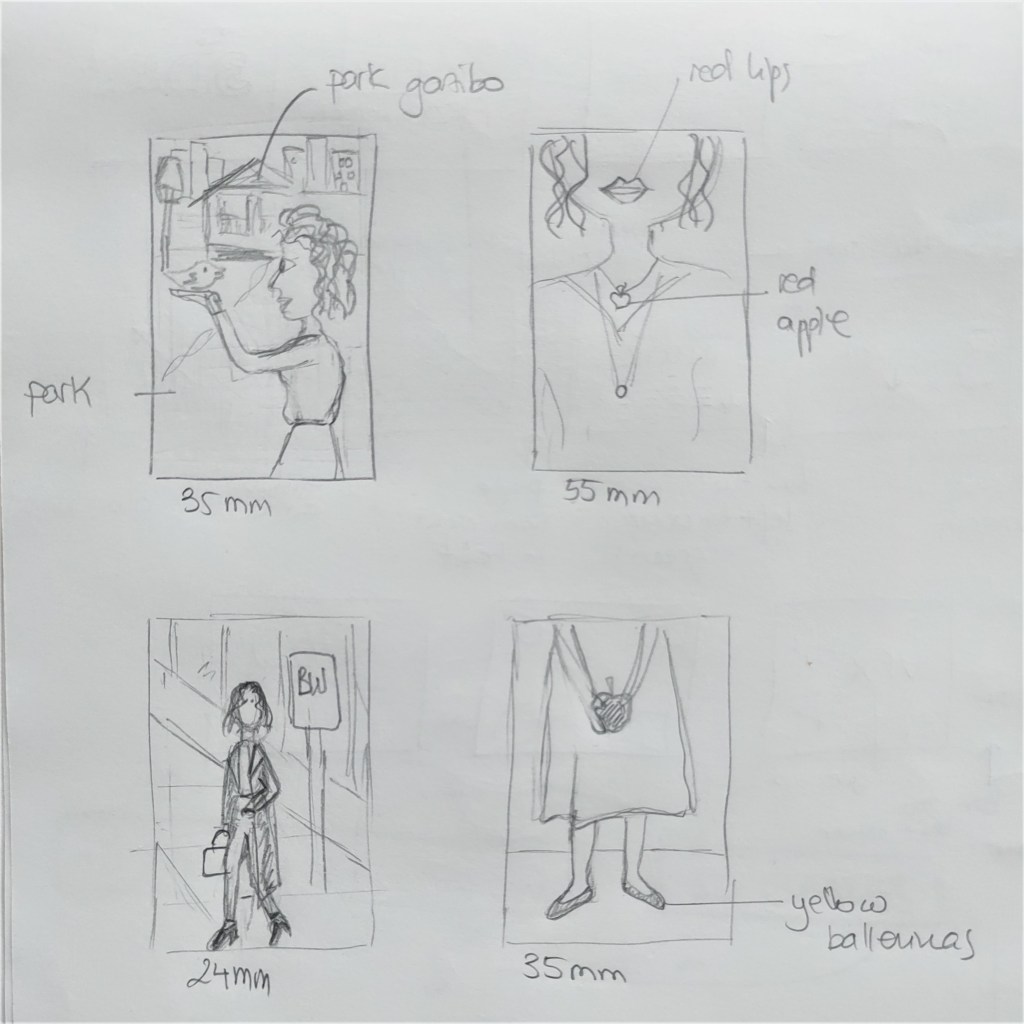
Create a storyboard
Create a shot list
Create a timeline for the shoot day
The concept for this photoshoot is a modern, urban Snow White. I searched for ideas online and created the mood board below, where I collected inspiration and examples on fashion, hairstyle and makeup. After that, I sketched a storyboard with four different photo ideas and made a shotlist and timeline. If this were an actual shoot, I would also book the model and the rest of the crew. I’d ask for permission to shoot to the Stavanger municipality and rent the equipment necessary for the session that I don’t own. I’d send the timeline to the crew and make sure everything is ready for the shoot day.
Describe the steps that you will take to ensure that you take a high quality photograph in low light conditions. Refer to exposure, lenses, tripods, colour temperature, flash and ISO. Your answer should be a minimum of 350 words.
Question 2 – Practical assignment
Watch the LinkedIn course Photography 101: Shooting in Low Light by Joseph Linaschke
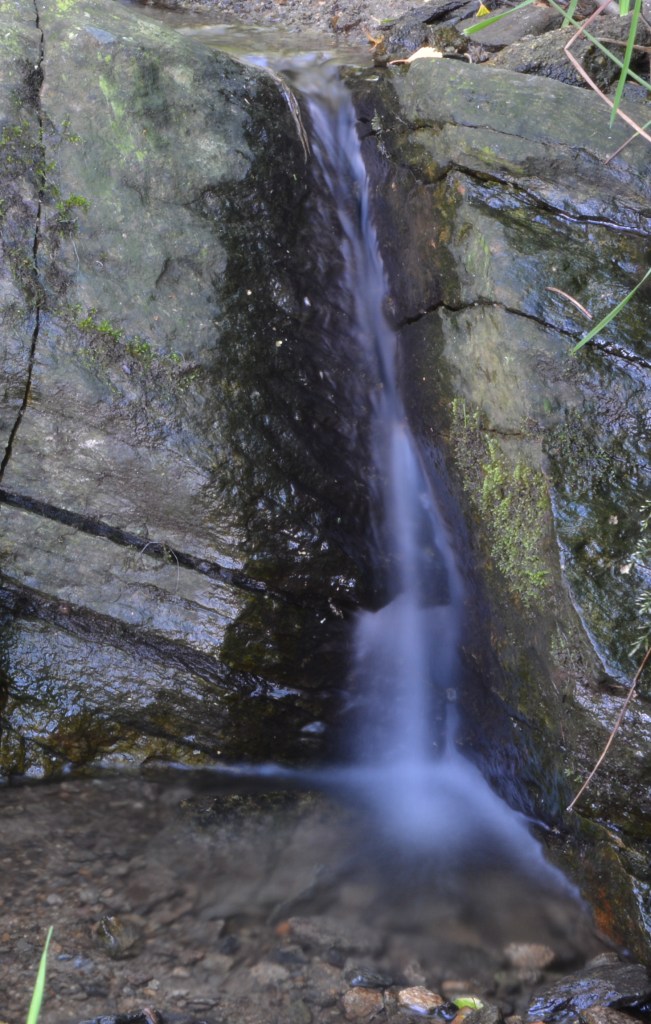
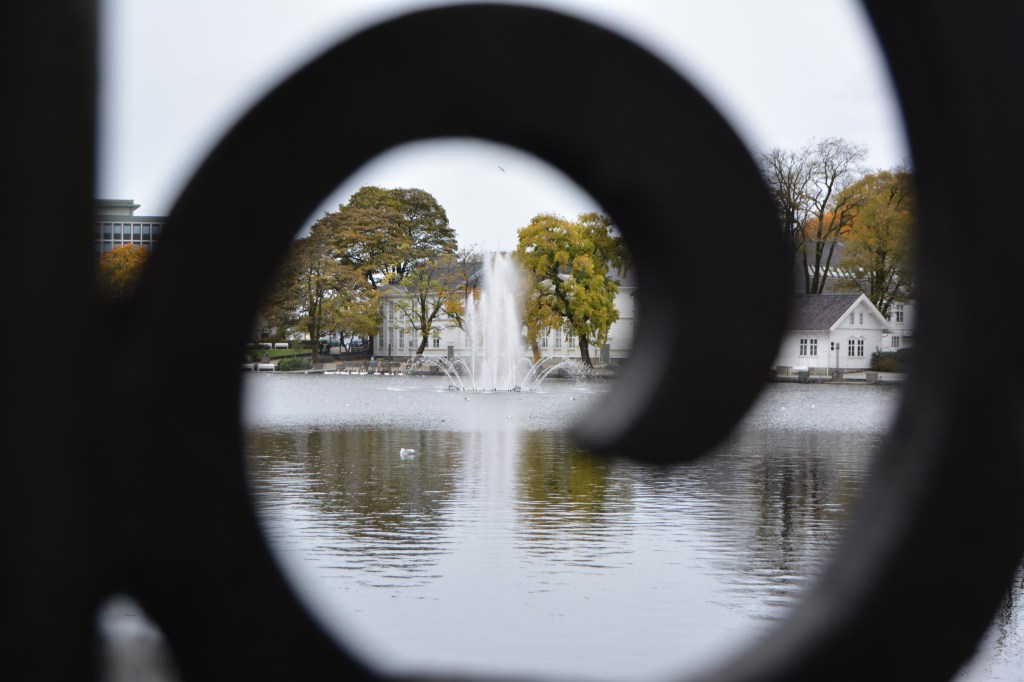
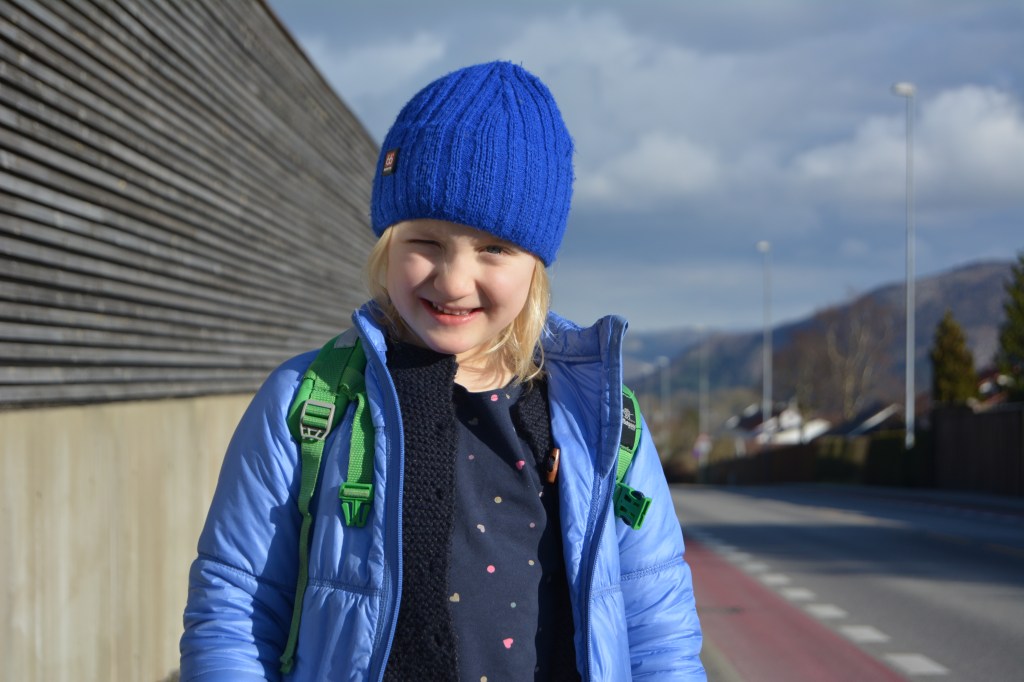
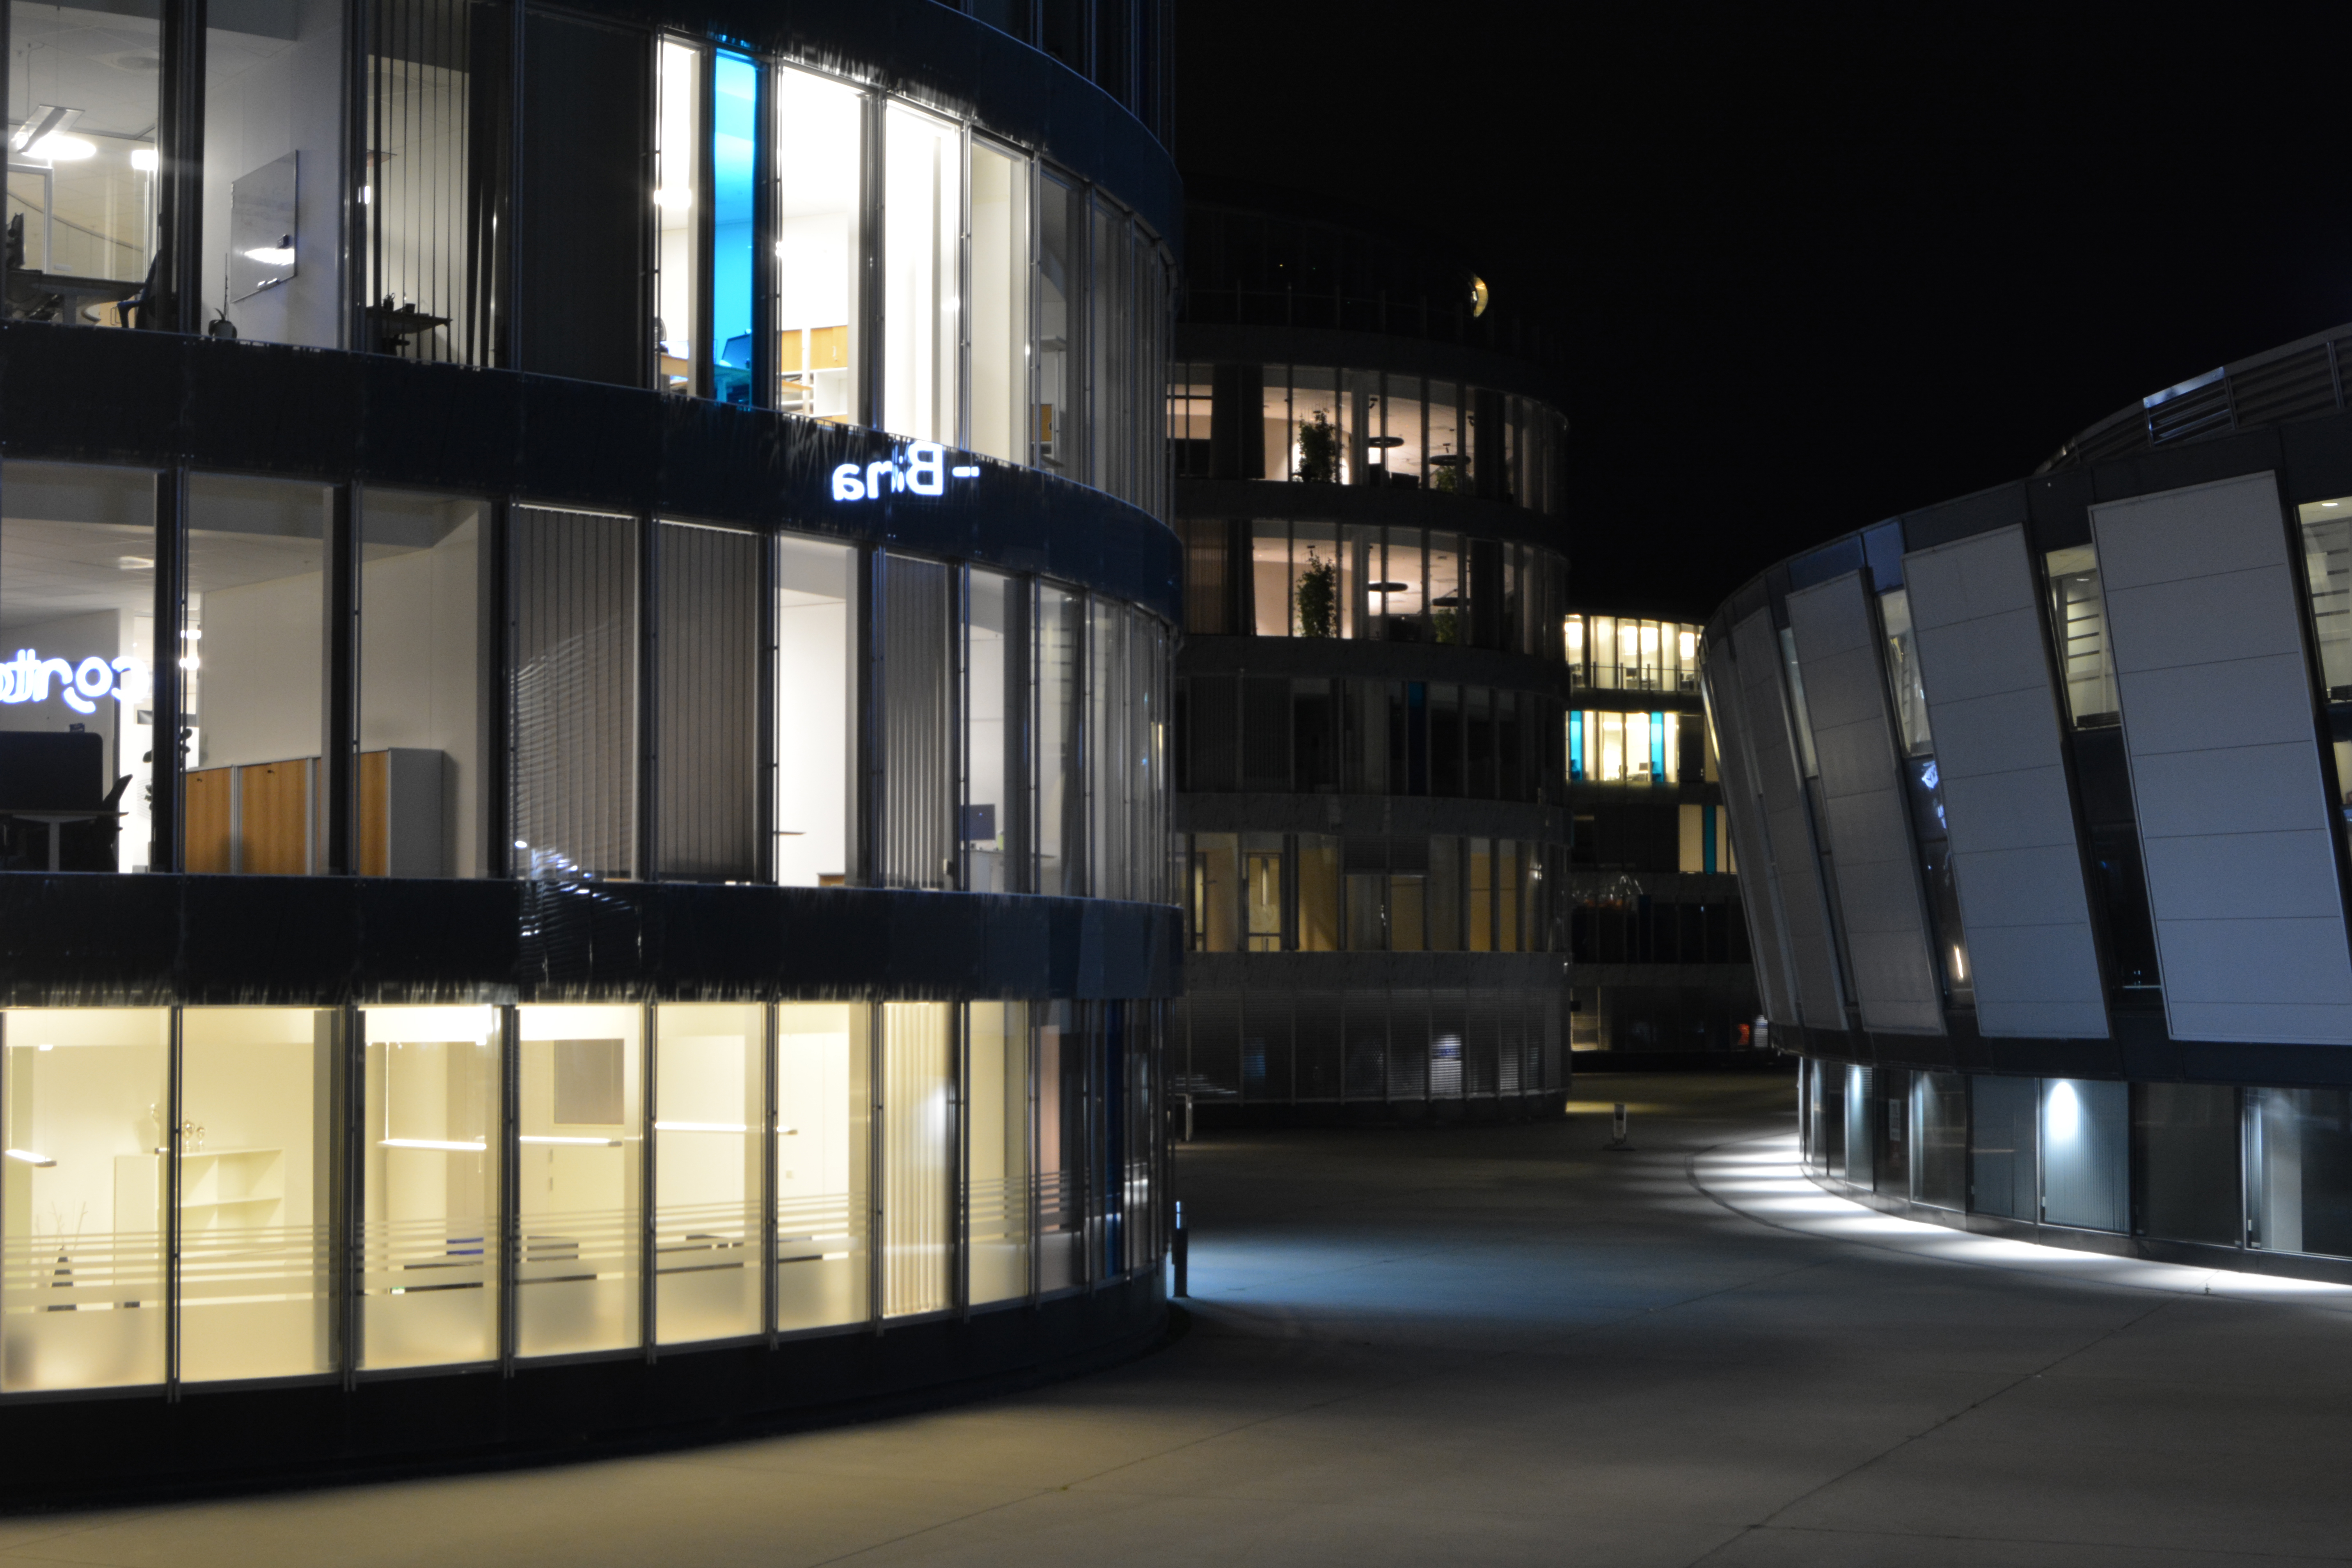
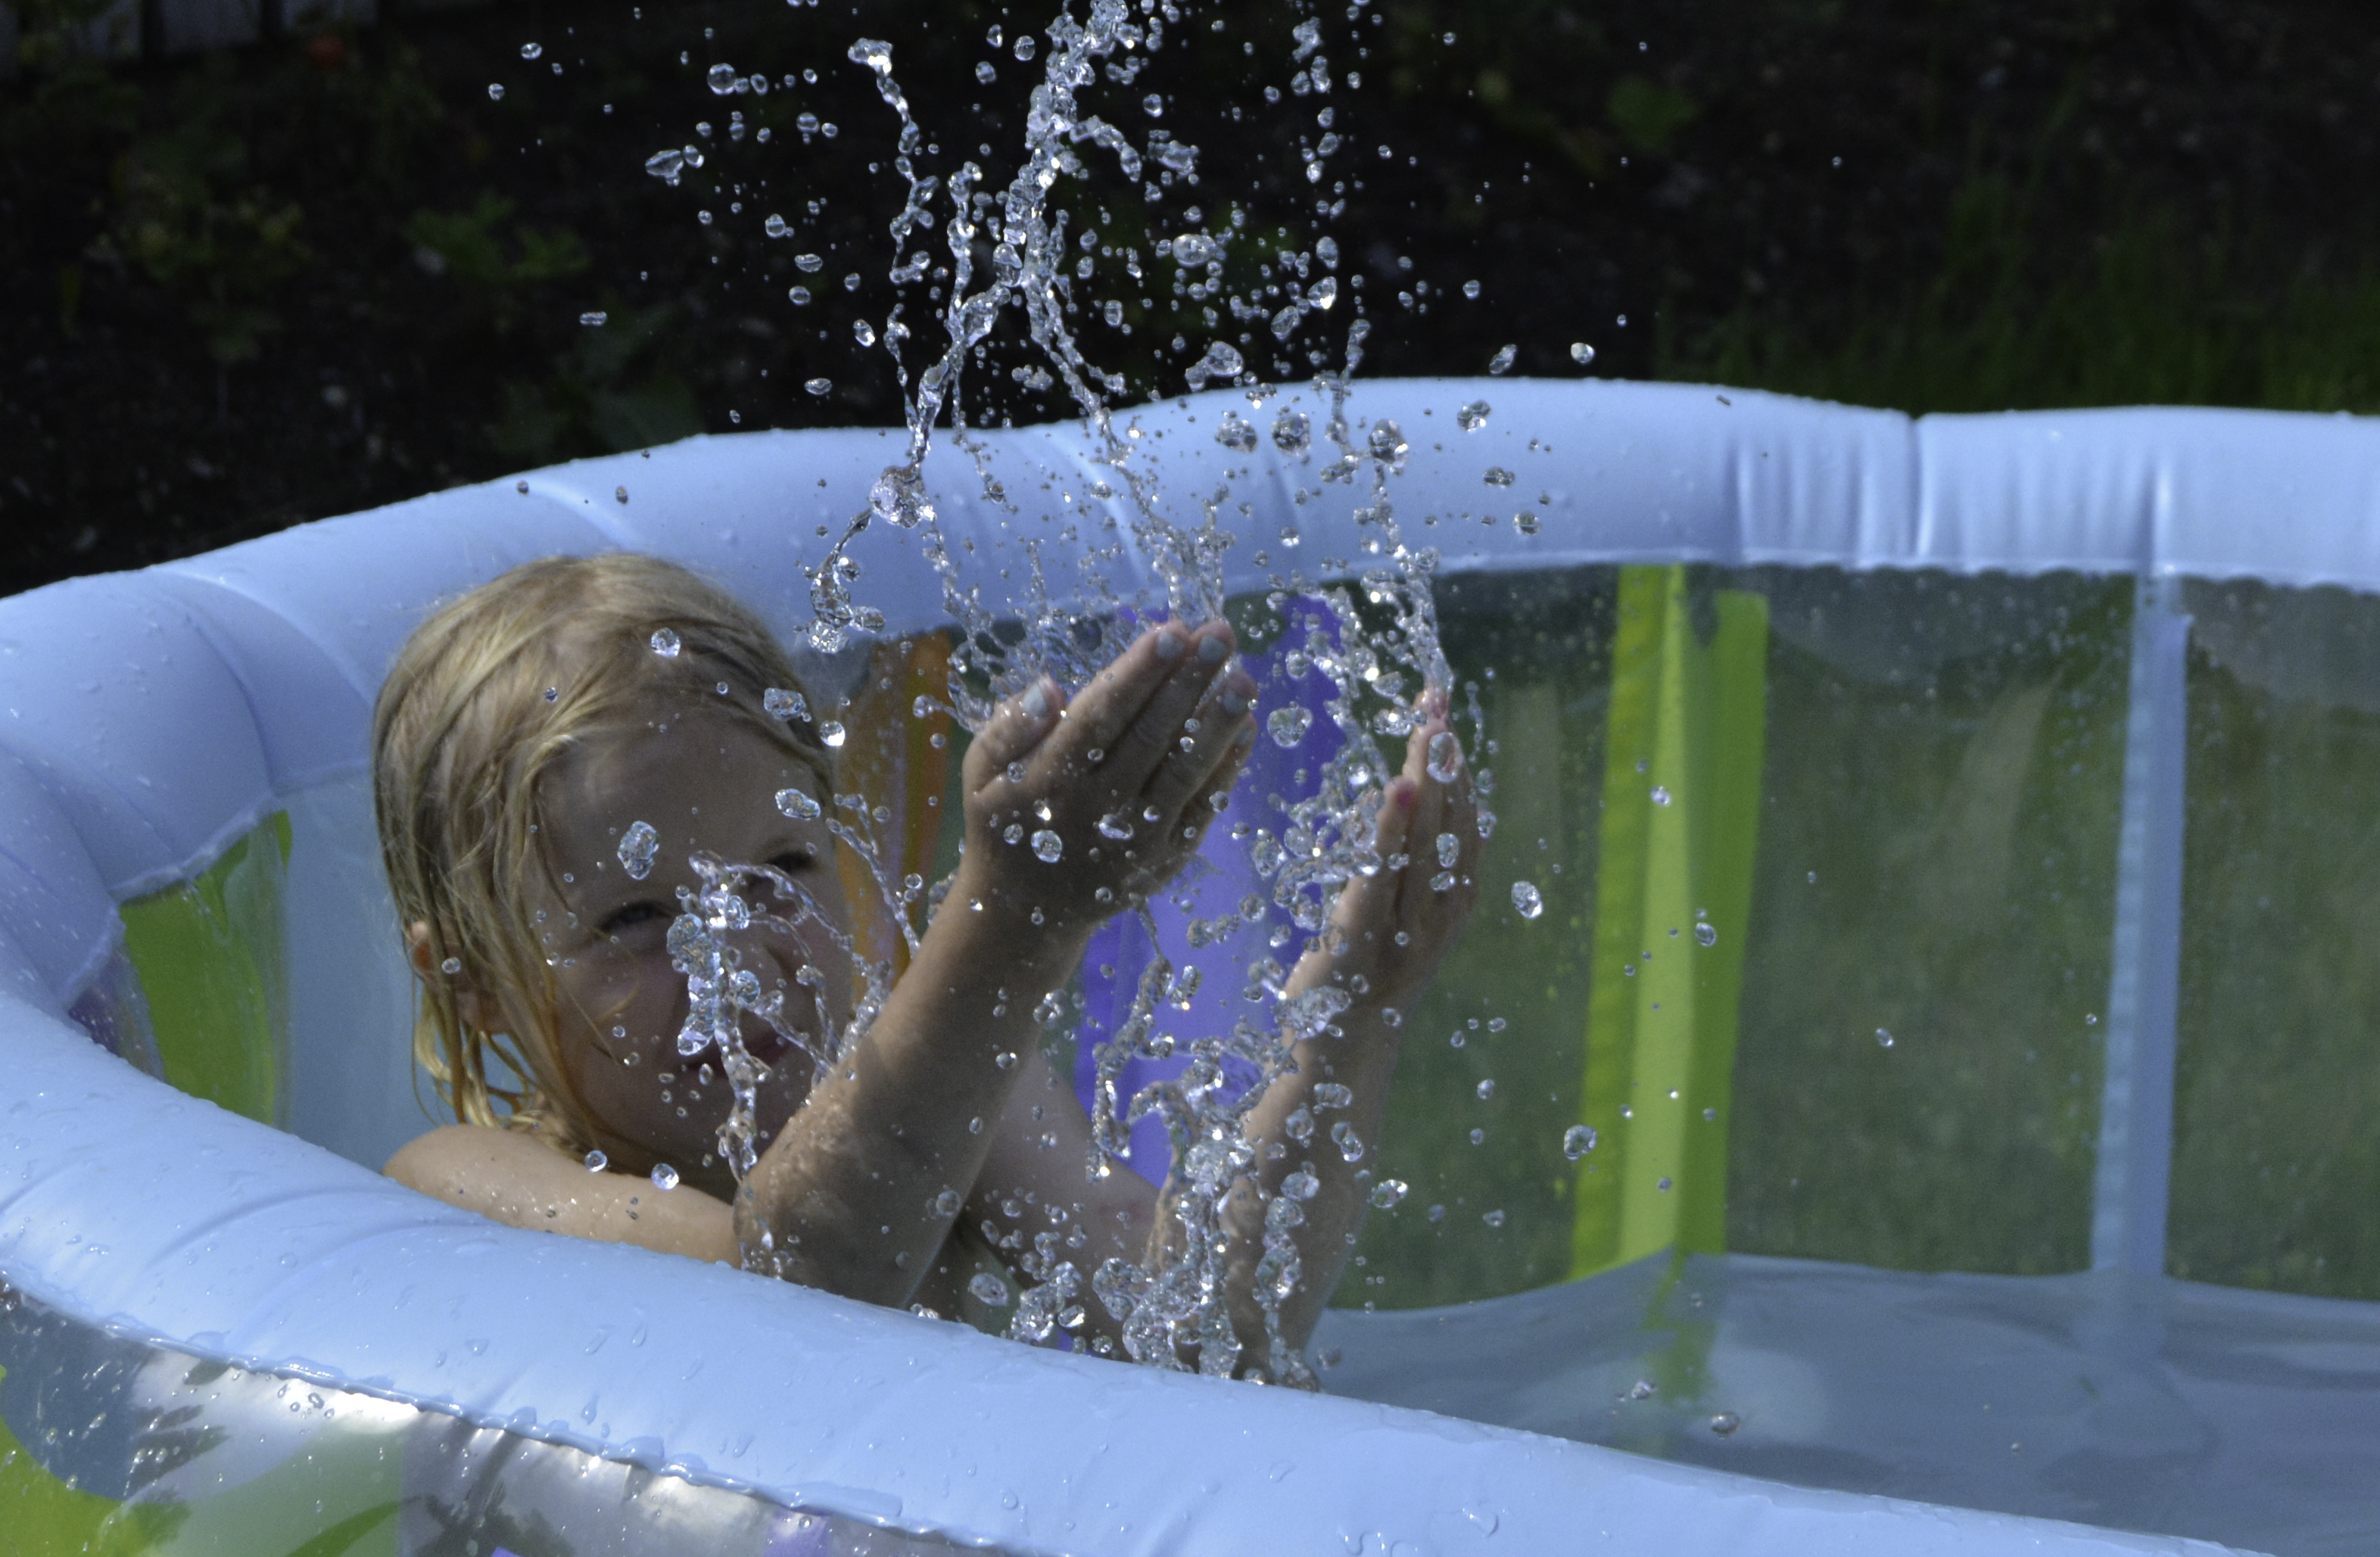
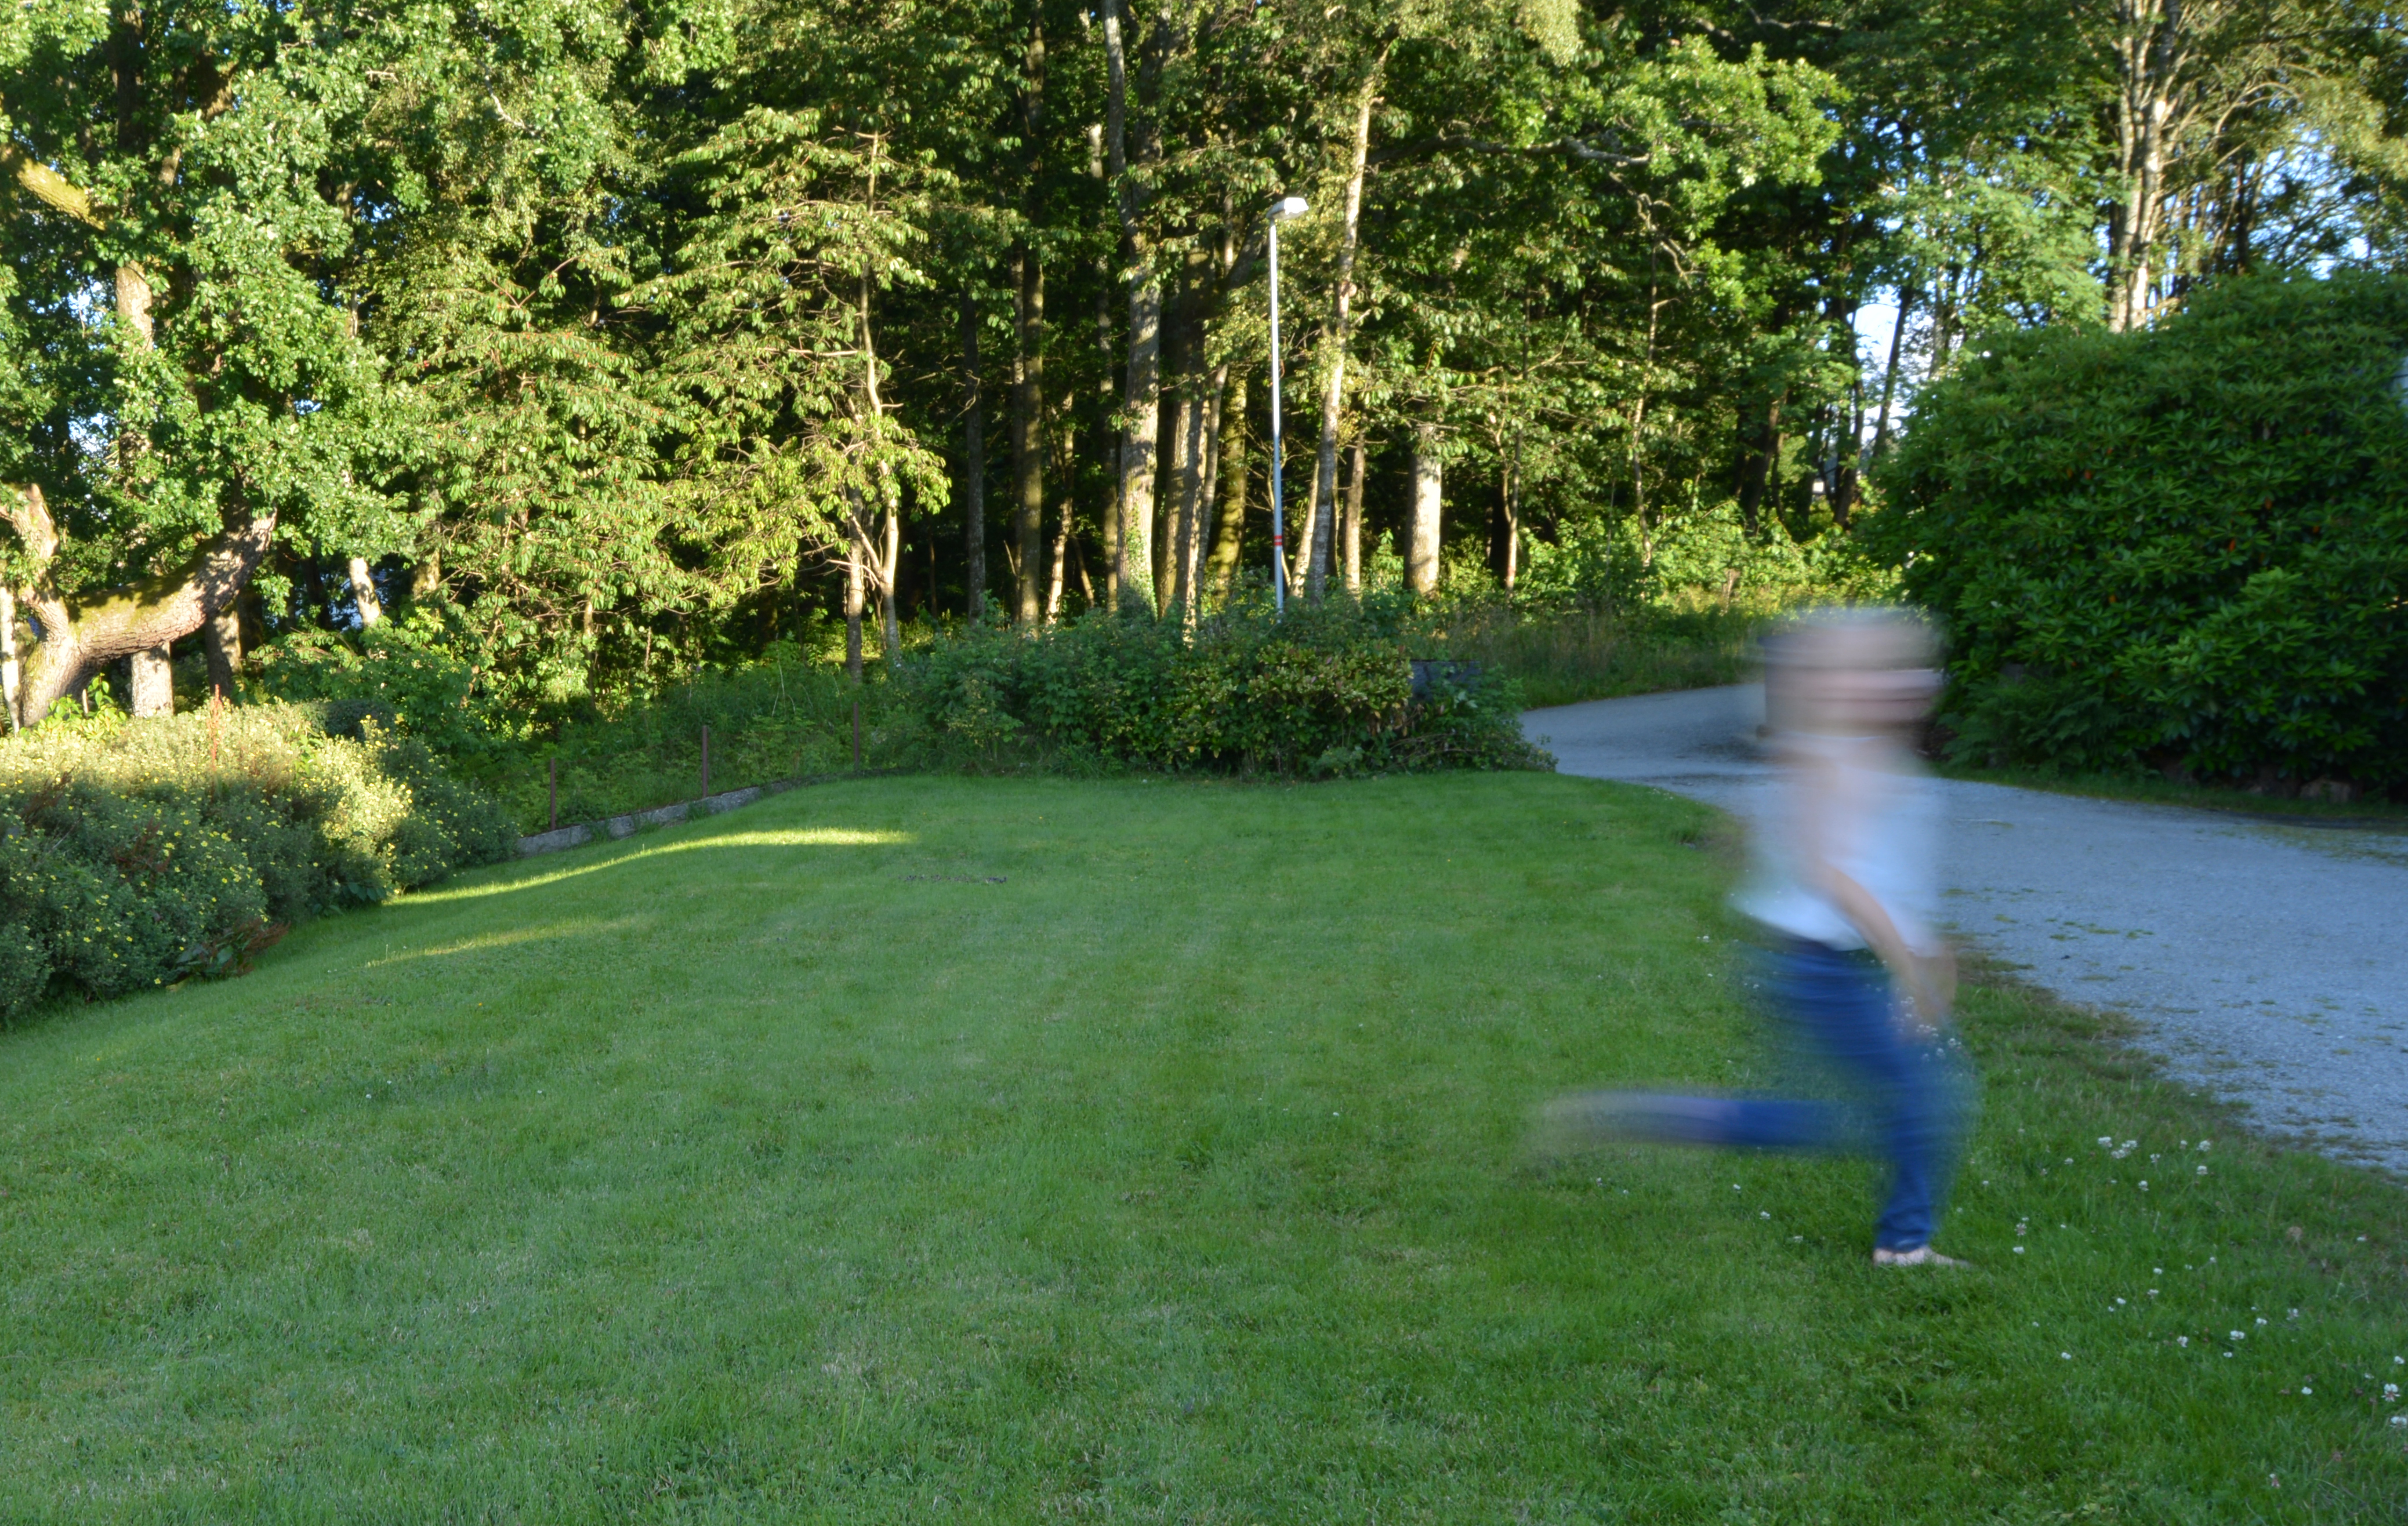
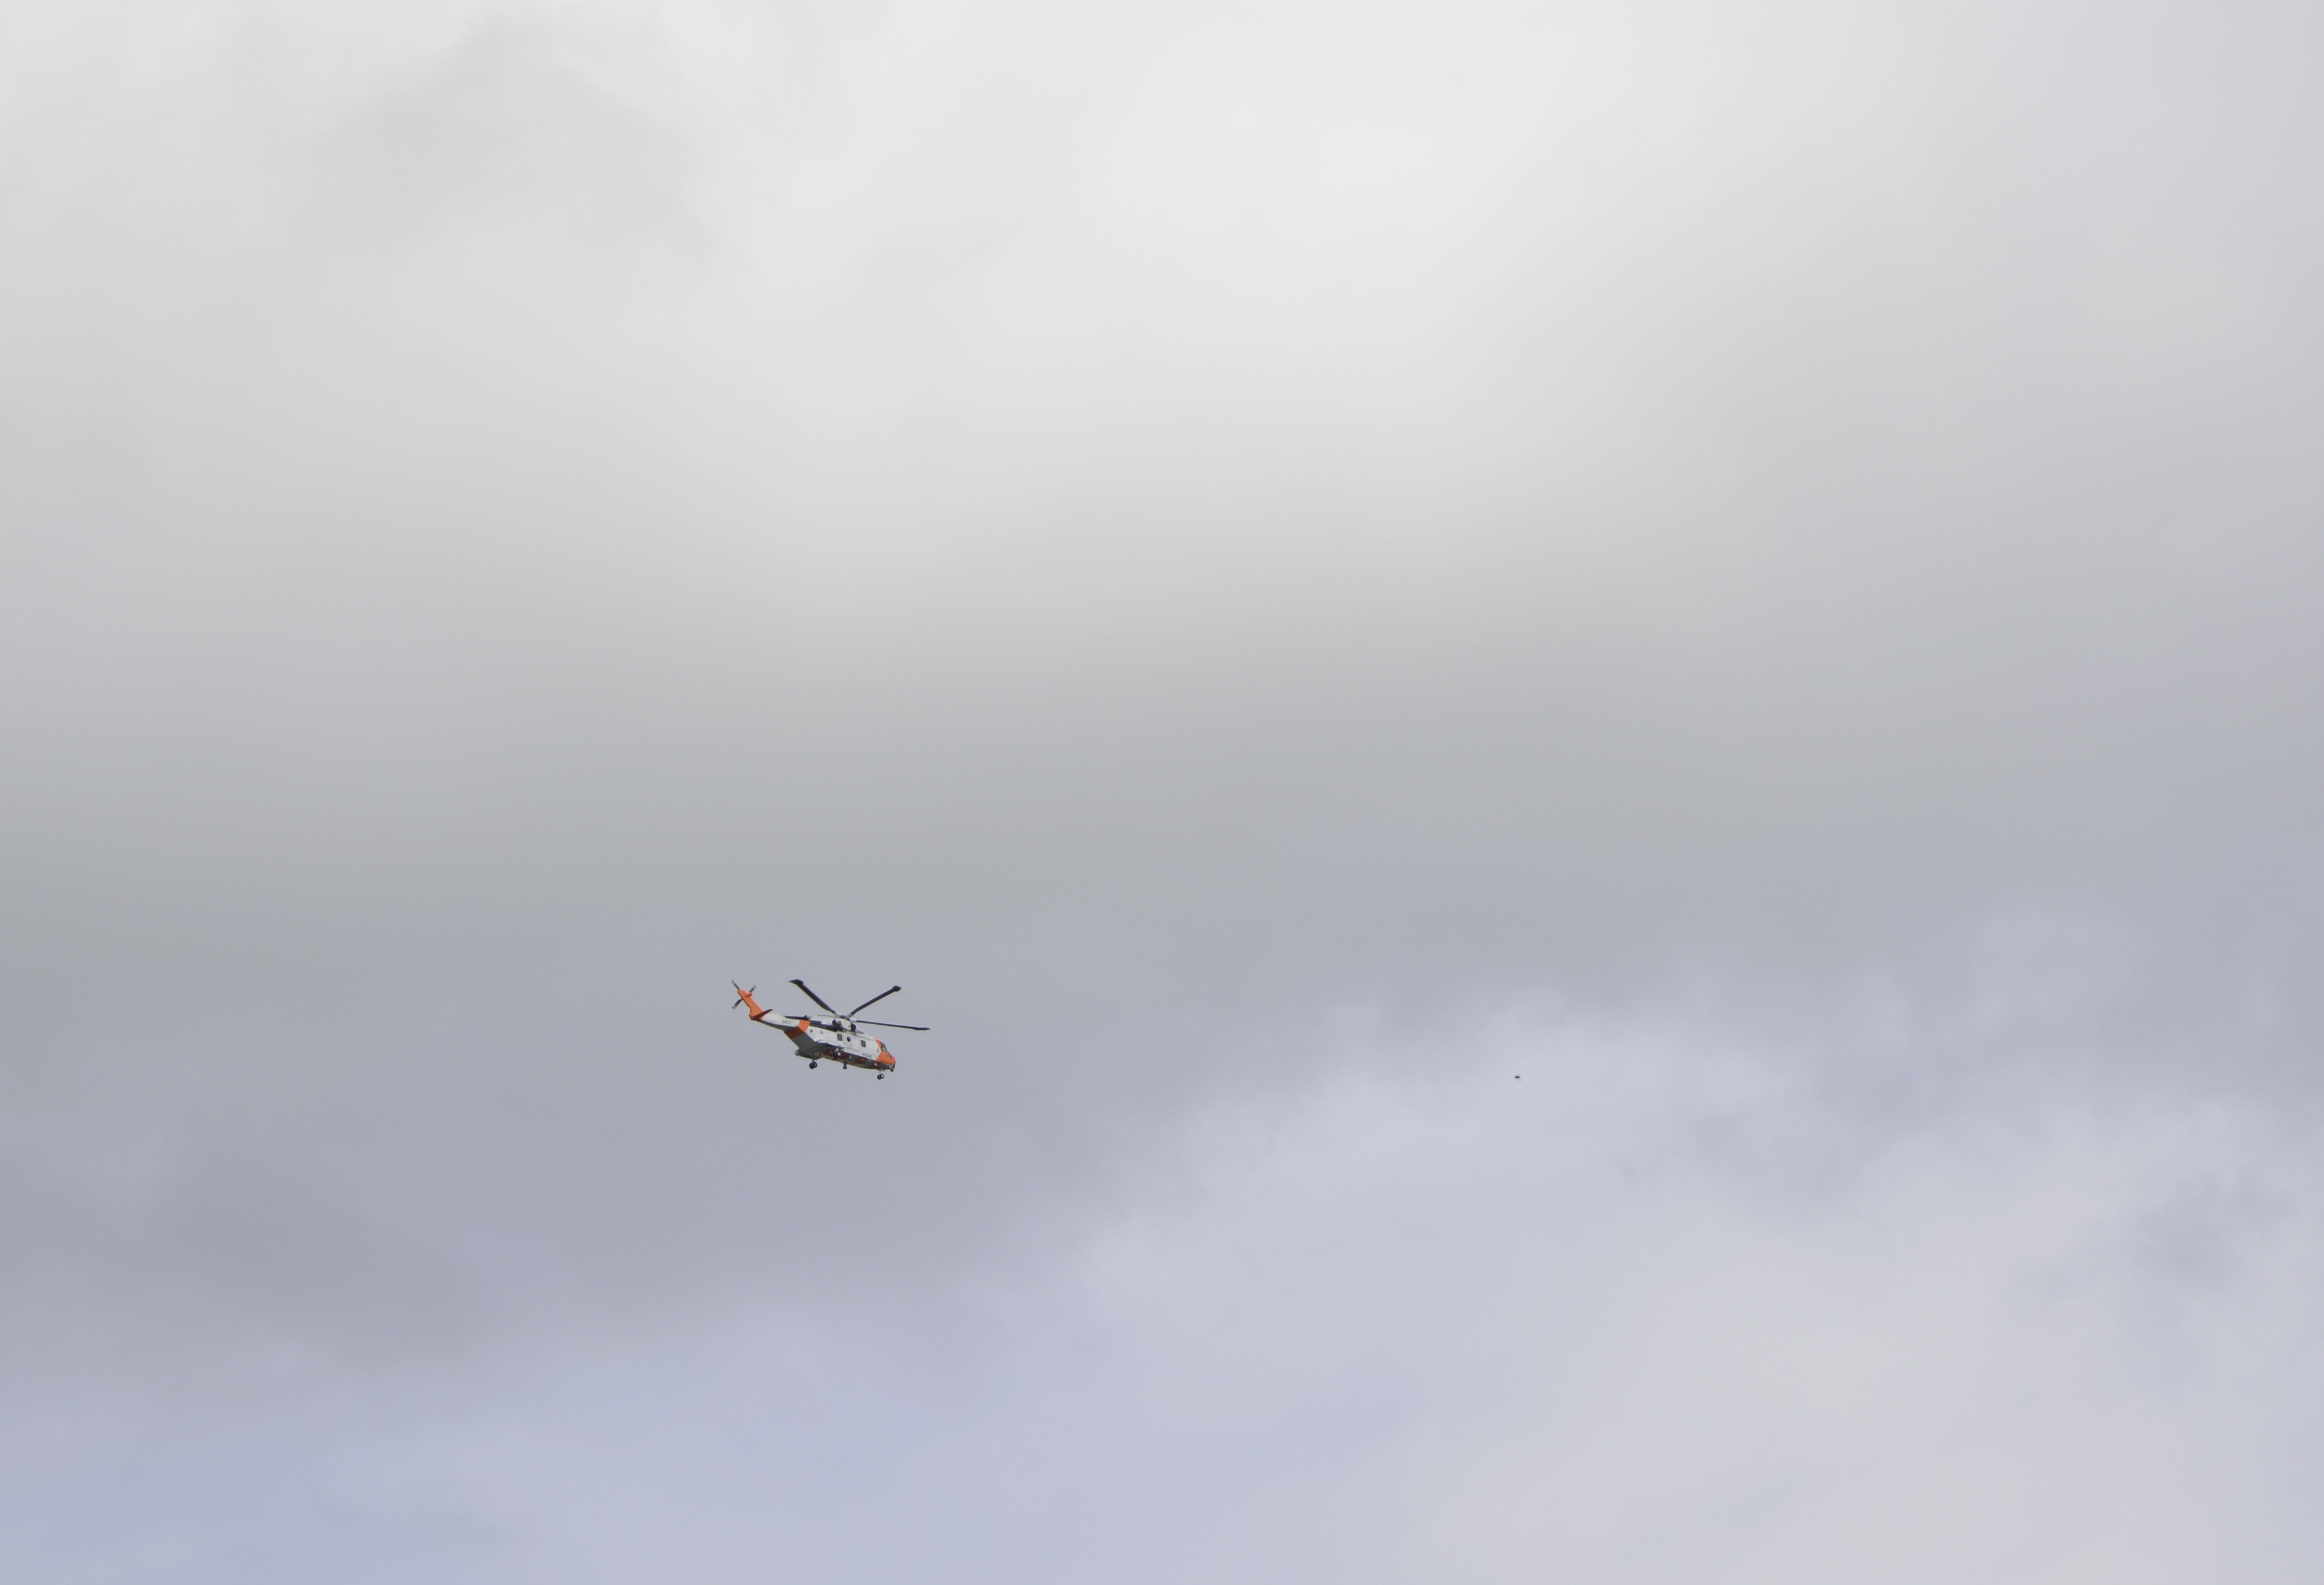
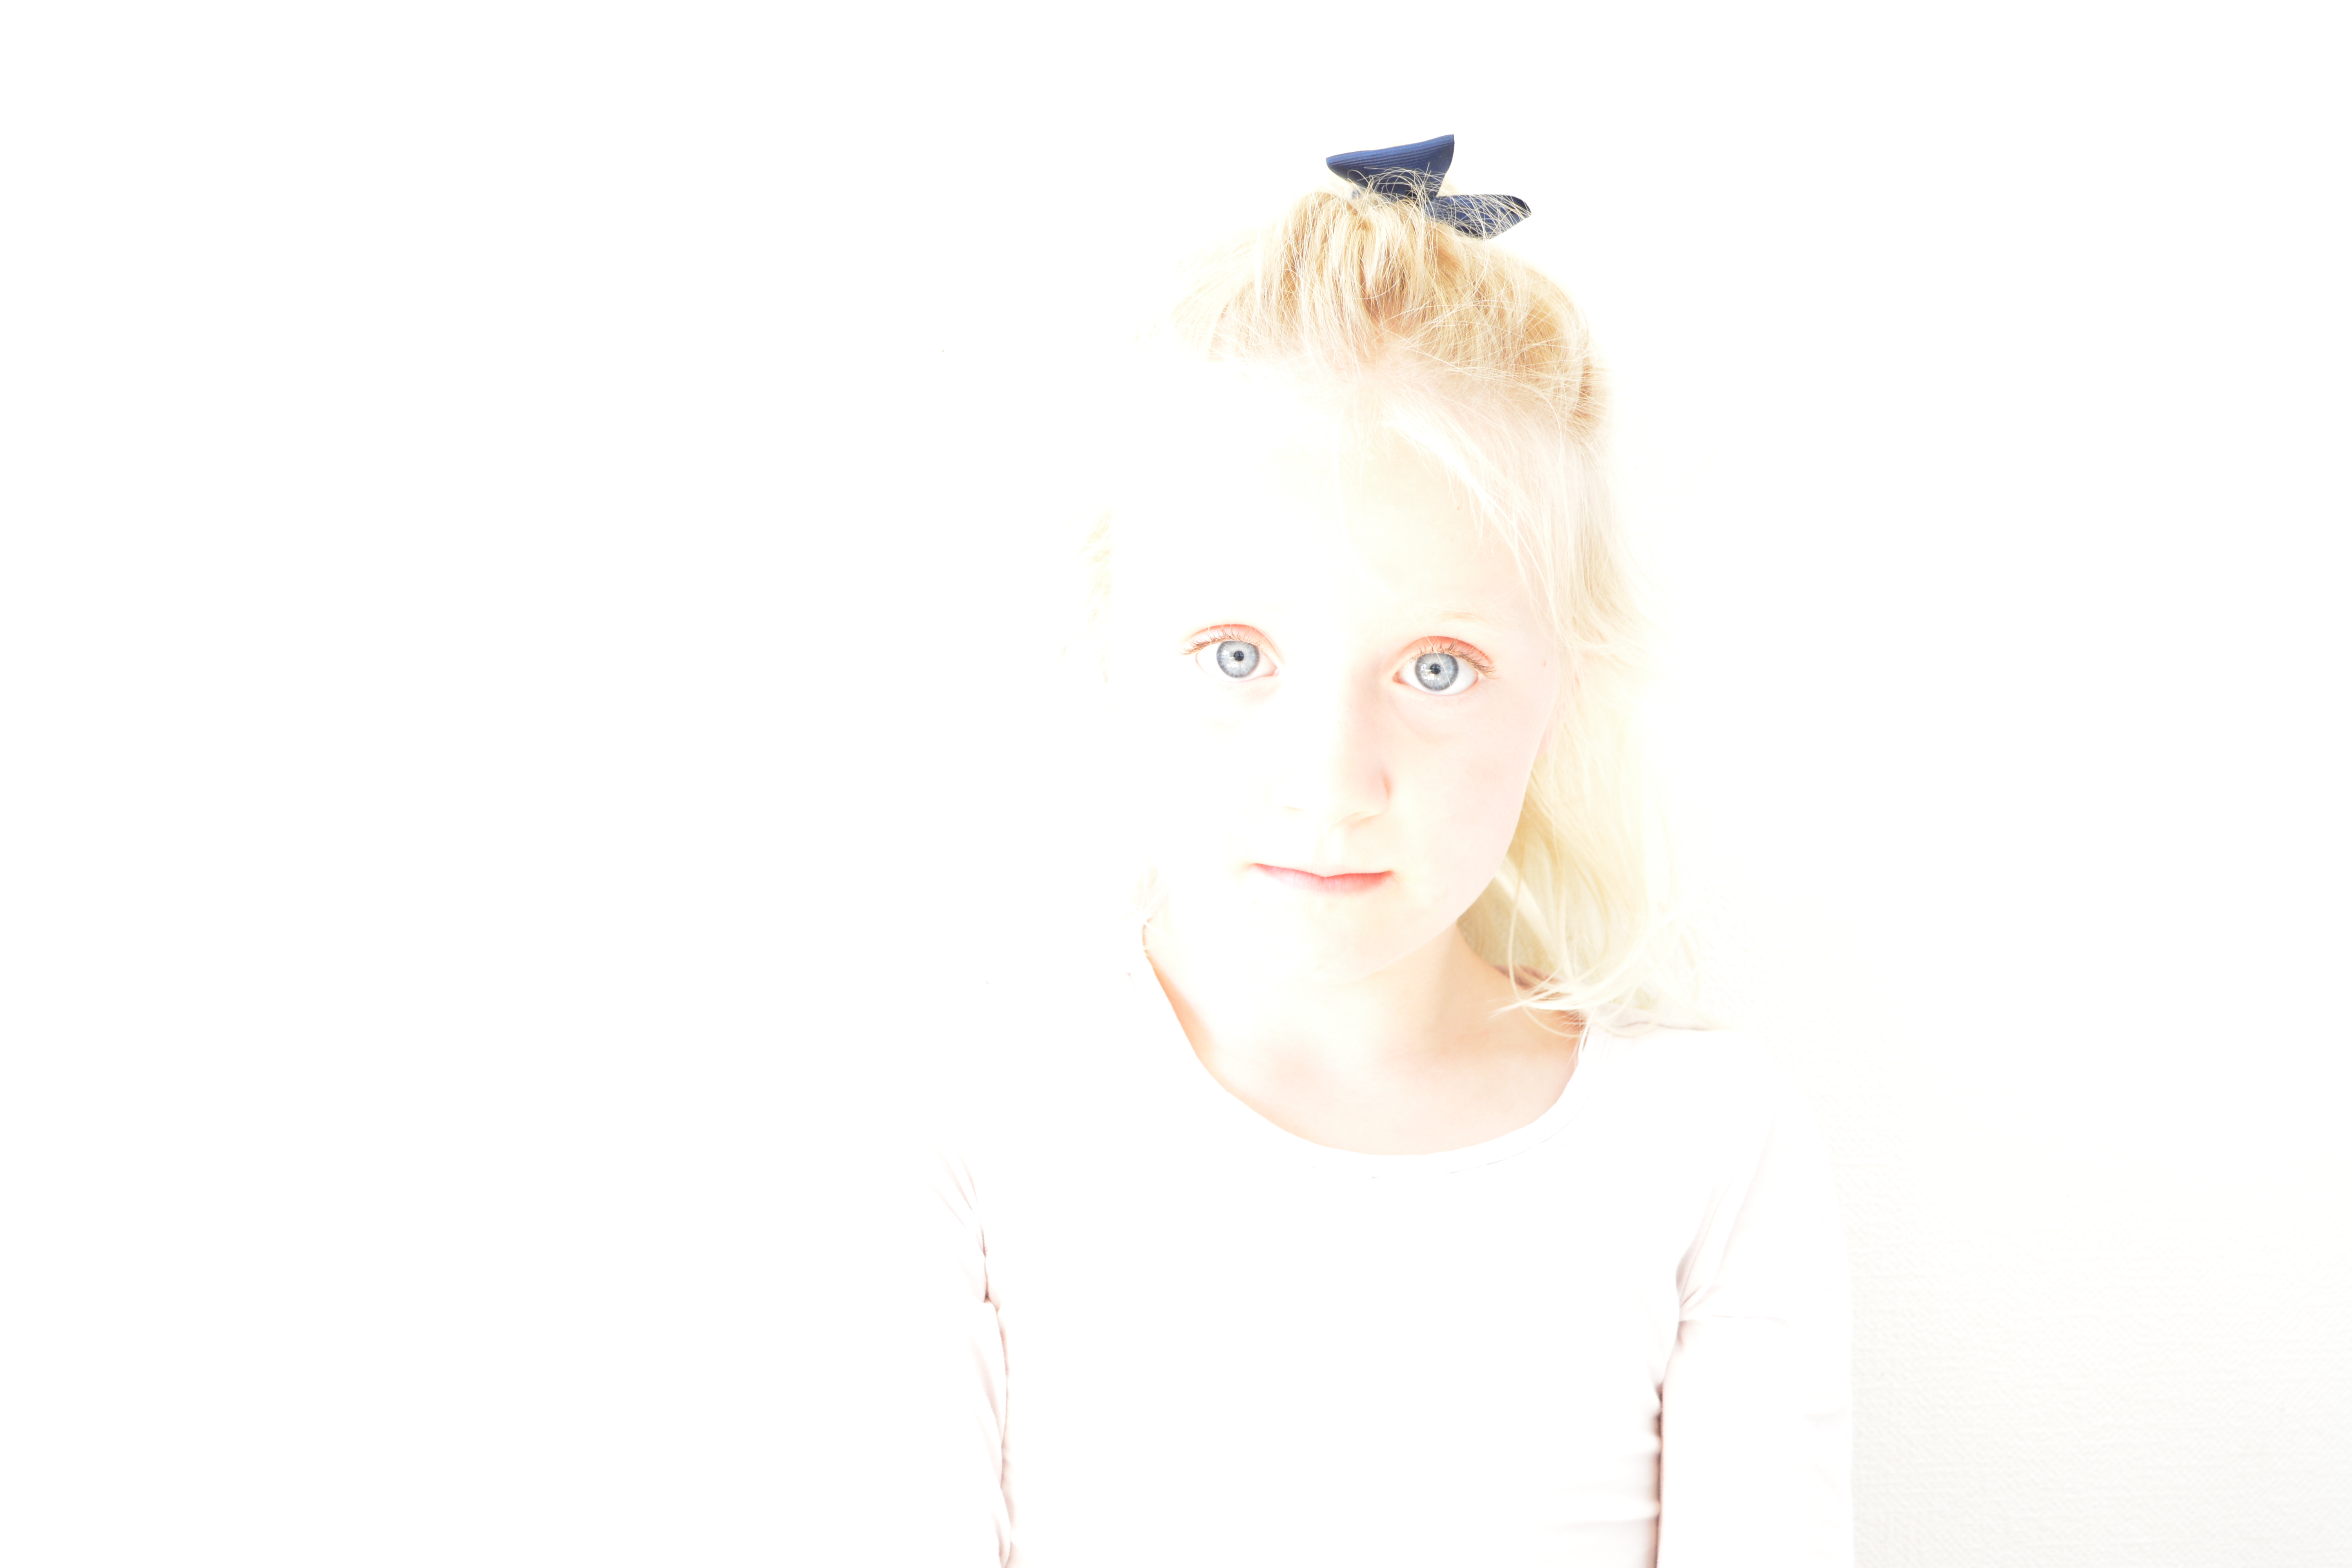
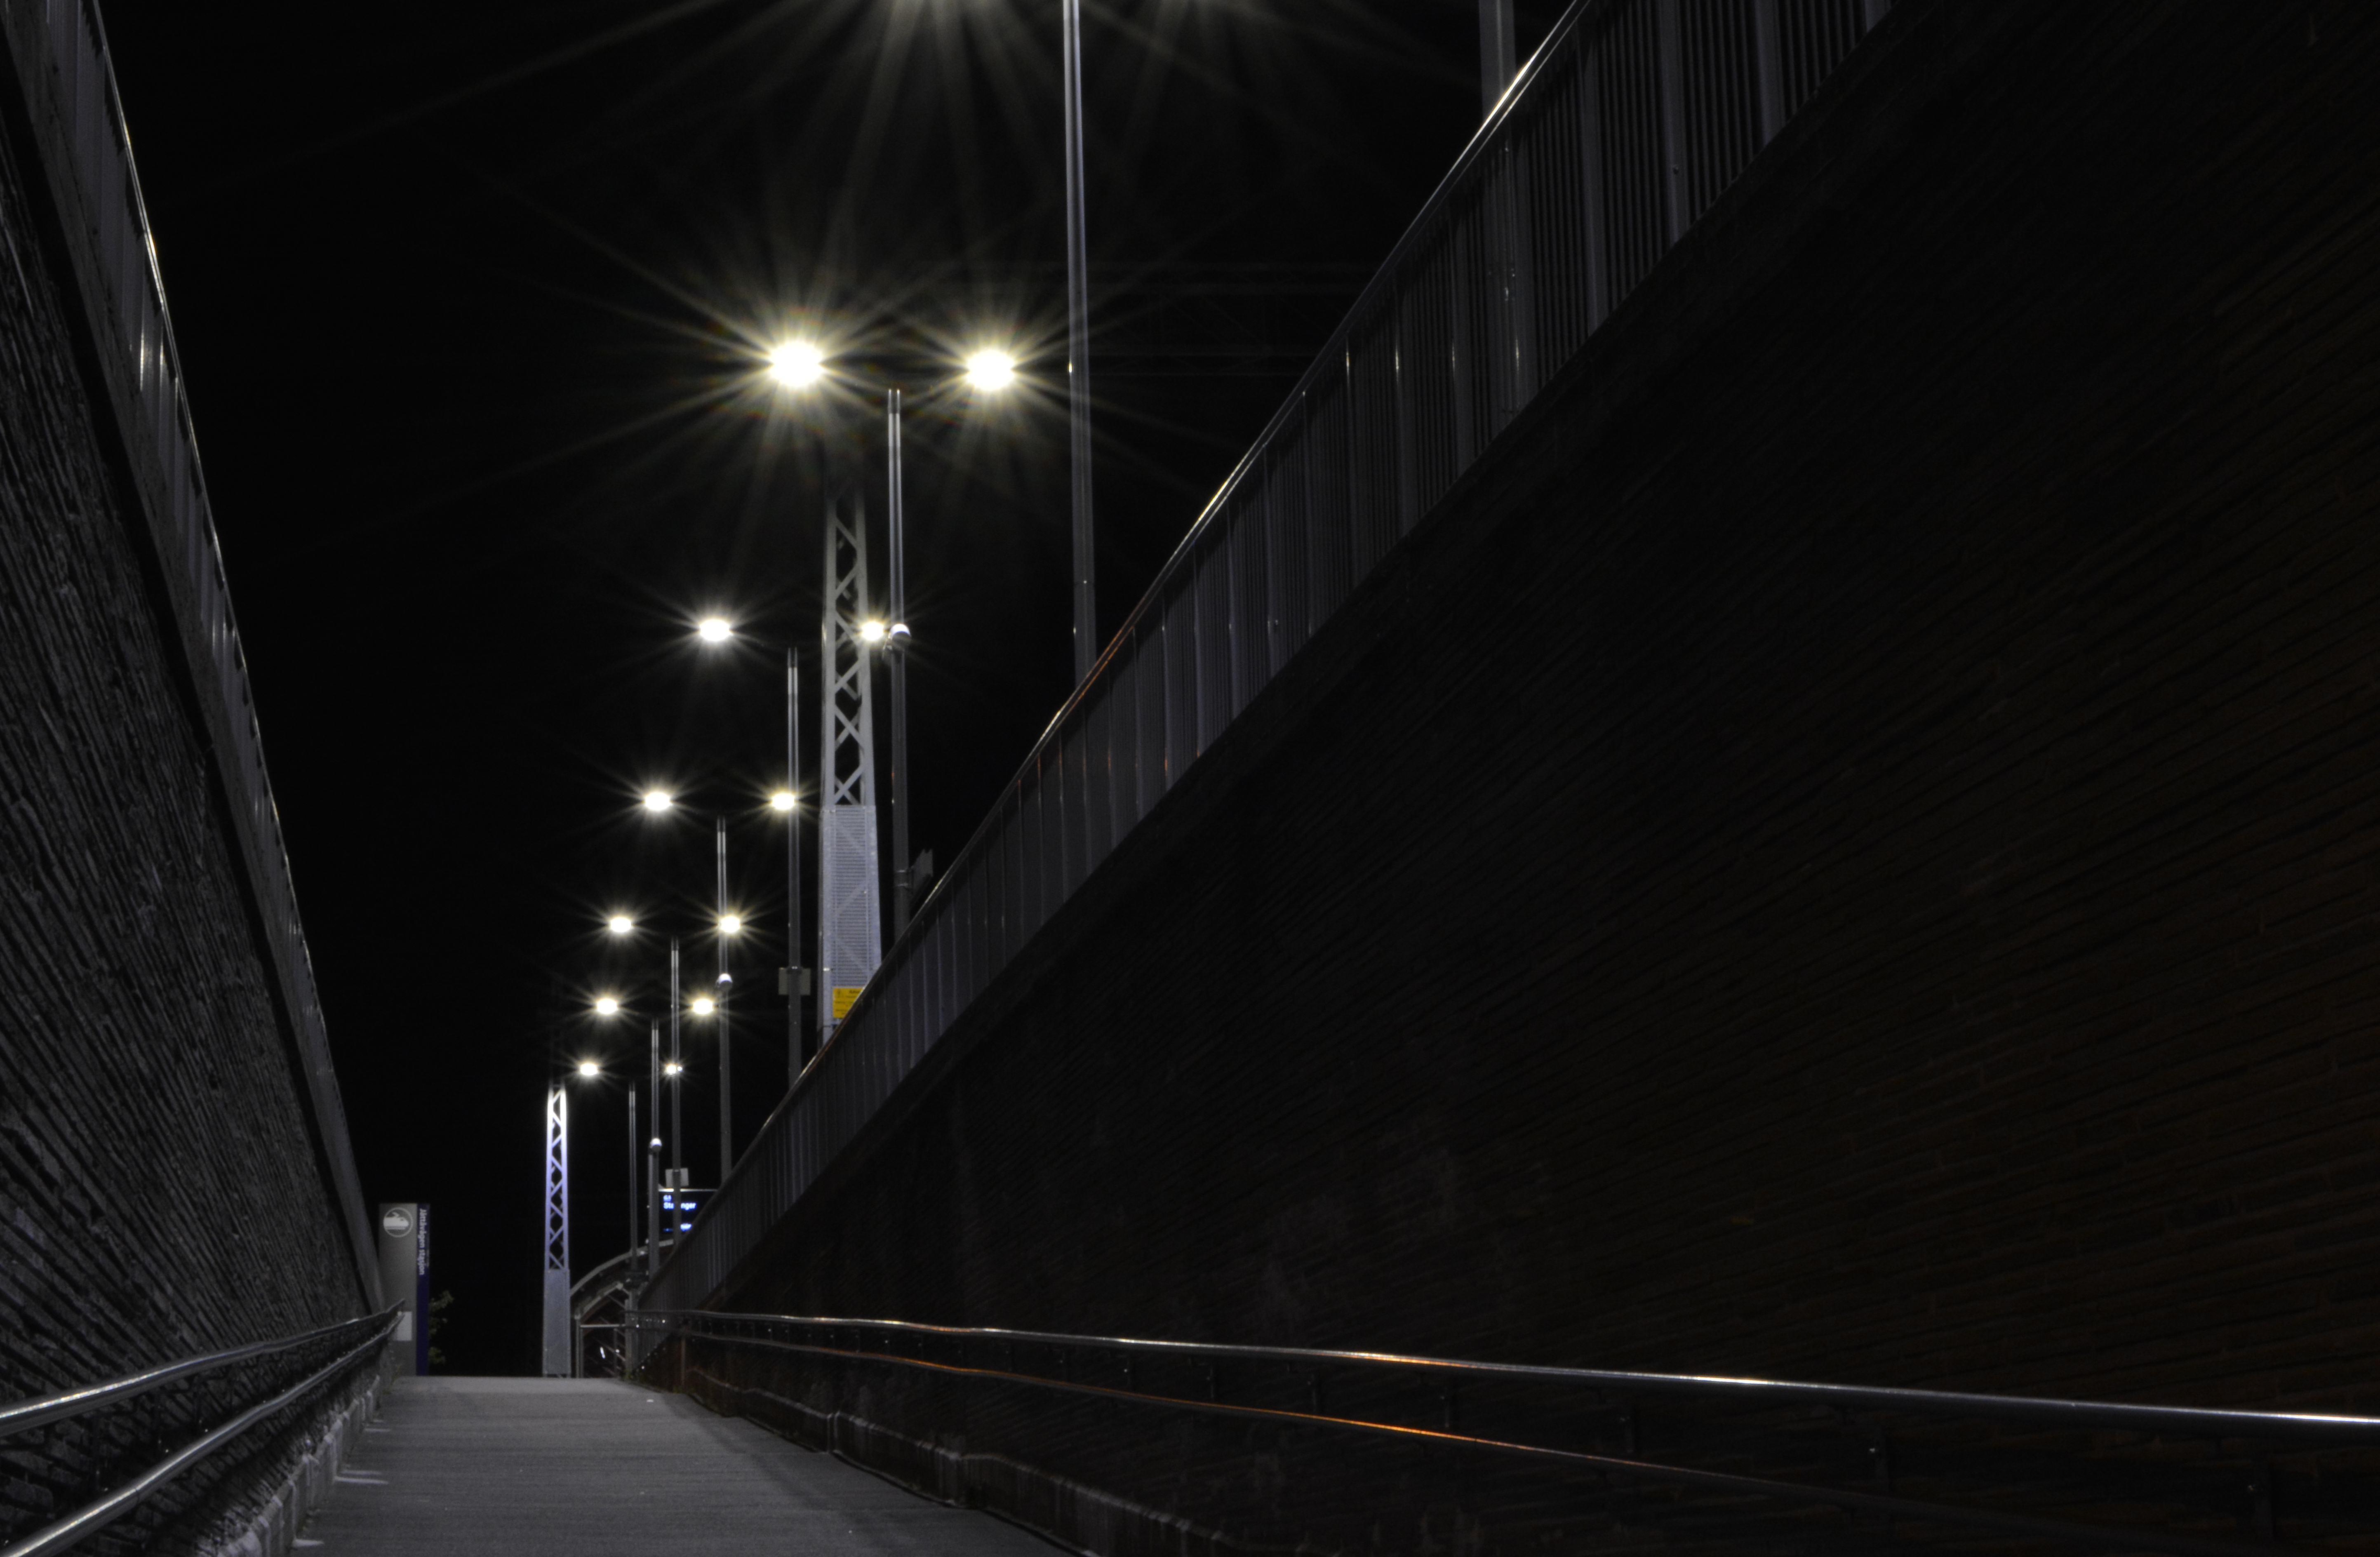
Take four low-light photographs: – One should be a sharp photograph that focuses on a static object, like a building or statue. – The second photograph should showcase moving objects, like cars or running water. – For the third photograph, take a moody portrait of a friend and use high ISO settings to your advantage. – The fourth photograph should explore using external light sources, like a Speedlite flash (please note, if you don’t have the equipment to take this last photograph, you may leave it out).
ISO 640 32 mm f/13 1.3 sec
ISO 100 32 mm f/20 10 sec
ISO 2000 55 mm f/5.6 1/50 sec
ISO 100 42 mm f/5.0 1/200 sec – Nikon Speedlight SB-300
Question 1 – Written assignment (Research and analysis)
Draw up a list of the most important aspects of a product photograph. Refer to shadows, lighting, quality, ISO and editing in your answer. Mention at least five things.
1 – Lighthing: Good lighting is the most important aspect of product photography. We need to have full control over lighting the product. It should be soft, balanced and even.
2 – Shadows: As the lighting is diffused, the product’s shadows, if any, are soft.
3 – ISO: Should be kept at the lowest possible, ideally never higher than 100. The higher the ISO, the more noise.
4 – Quality: Product shots should be of a very good quality. It’s important to choose the highest resolution setting on the camera to get sharp photos.
5 – Editing: When the file format is Camera RAW the photos are easier to edit. The editing should be minimal, just to make small adjustments like cropping or removing the background, sharpening or adjusting the levels.
Question 2 – Practical assignment
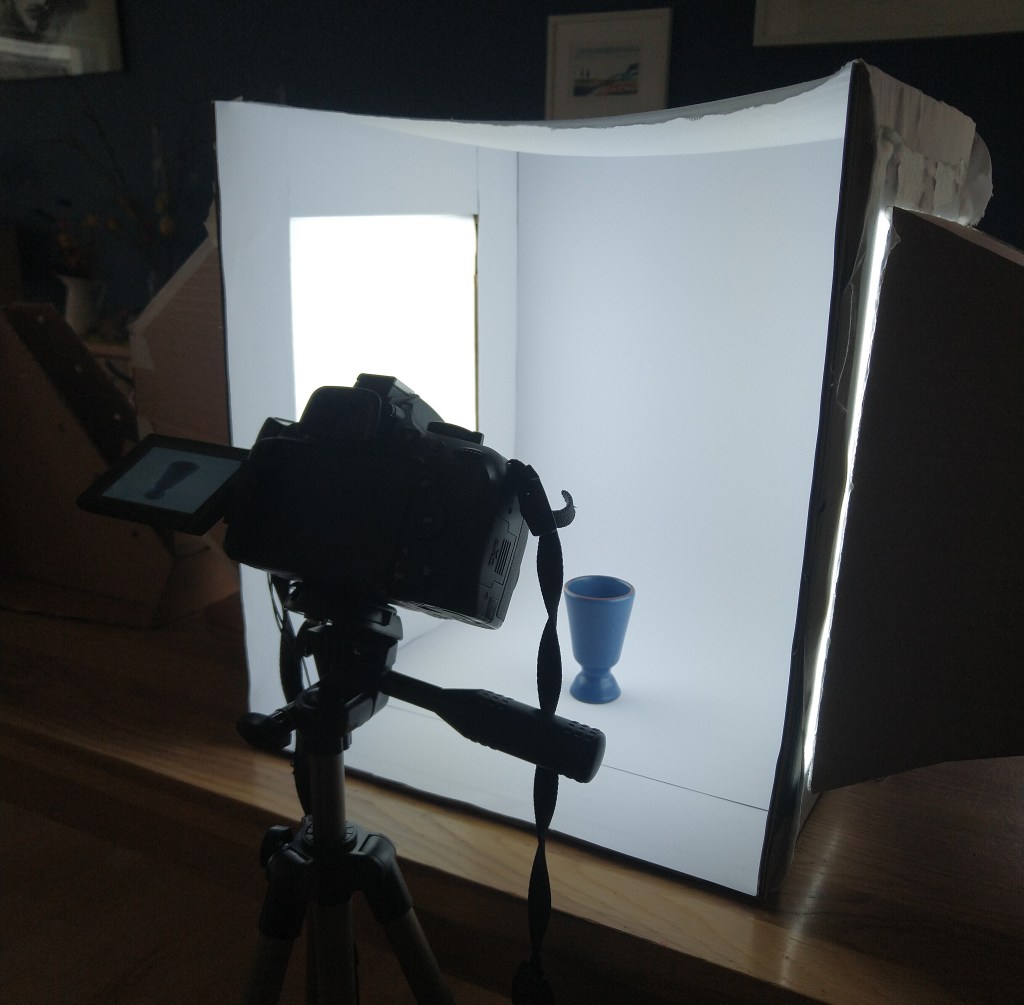
Make your own DIY light tent.
Take product photographs of the following objects:
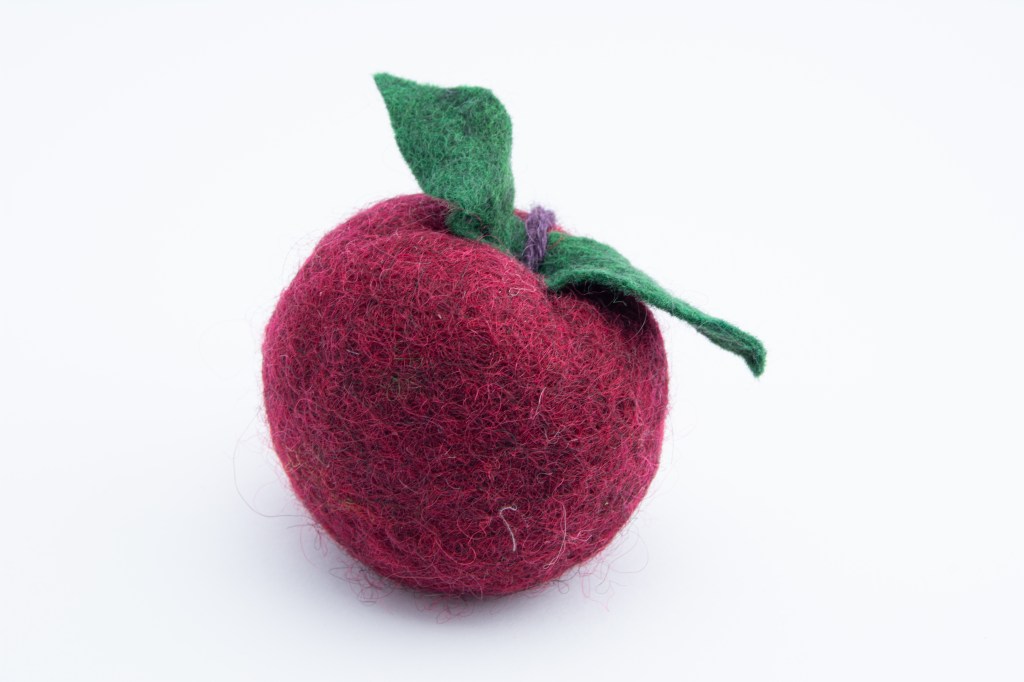
Something fluffy, like a stuffed animal
Something shiny, like a knife and fork
Something hard, like a book or a mug
A liquid, like a glass of wine
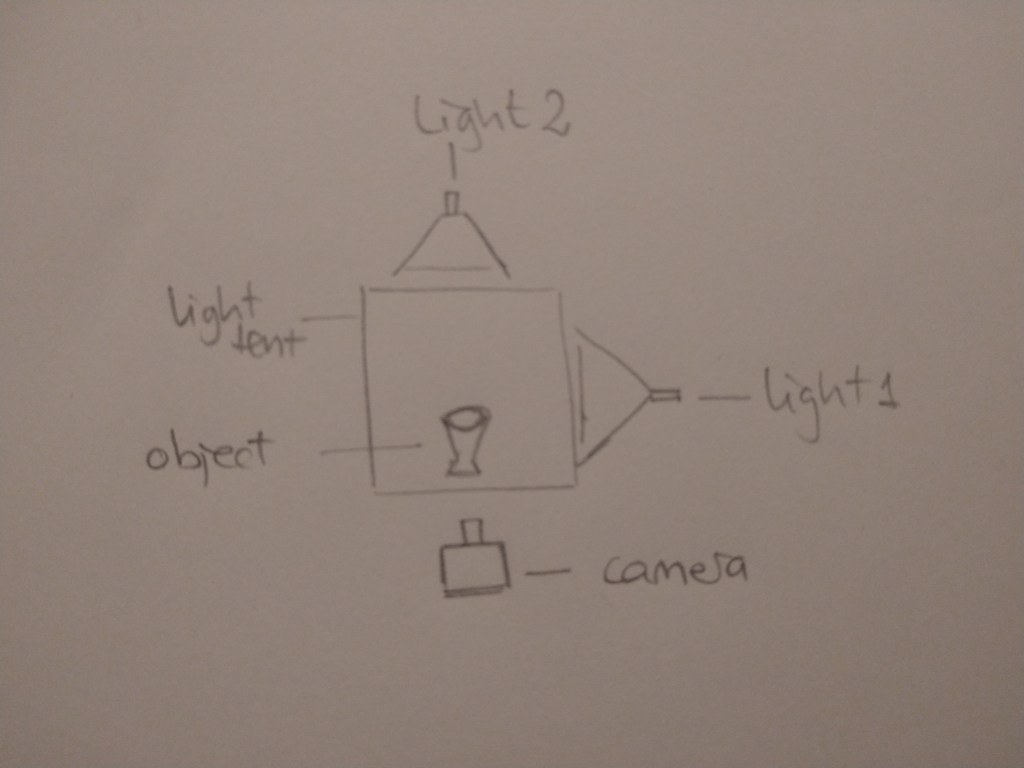
Draw a diagram of your lighting scenario for each of the above photographs and submit it along with the photographs.
Edit your photographs with the software of your choice. Write an accompanying paragraph for each of your photographs and explain what you did during the editing process.
This is the light tent I made for this assignment. I used the cardbox lamps I made for MA06 last semester.
1 – something fluffy
2 – something shiny
3 – something hard
4 – liquid
Lighting scenario for all of the pictures above:
I edited my RAW files in Lightroom. I adjusted the temperature, exposure, contrast, highlights, shadows, whites, blacks and texture until I thought the photos looked the best.
This week we have learned about composition in photography. I had fun experimenting with my camera and trying to capture the compositional principles. These are my best photos.
1 – Name three lighting sources and their functions.
Flashguns -also known as speed-lights- are external flash units employed by the photographers. These battery-powered flash units are mounted to the hot shoe or can be used off-camera by attaching them to the slave units. The sole purpose of the external flashes is to boost the flash-range of on-camera flash.
Head and power packs consist of a flash and a small power pack that acts as the generator for operating the flash light. You can attach multiple flash heads to a single power pack, and all these flash heads are comfortably controlled by the controls & knobs provided on the power pack itself.
A monolight is a portable photographic flash lighting unit which has its own independent power source. Unlike a head and power pack kit, it does not depend on a centralized power supply. Each monolight has its own power settings and light output.
2 – Name two light modifiers and explain the difference between them.
Umbrellas are one of the basic lighting equipment found in any basic lighting kit. Photographers use these reflective umbrellas as a diffusion device which soften and evenly spread the light over a larger area. The strobe light is mounted to the umbrella in such a way that the light hits the inside of the umbrella and bounces back to the subject with soft light and even illumination.
A softbox is also used for softening and diffusing the light. They come in varied shapes and sizes, but the most basic consists of a reflective surface surrounded by a diffuser. The flash head is fitted in such a way that the light falls on the reflective surface, passes through the translucent diffuser and produces a controlled soft light.
The difference between the two is that the light coming out of the softbox is more controlled and doesn’t spill elsewhere as it happens with umbrellas.
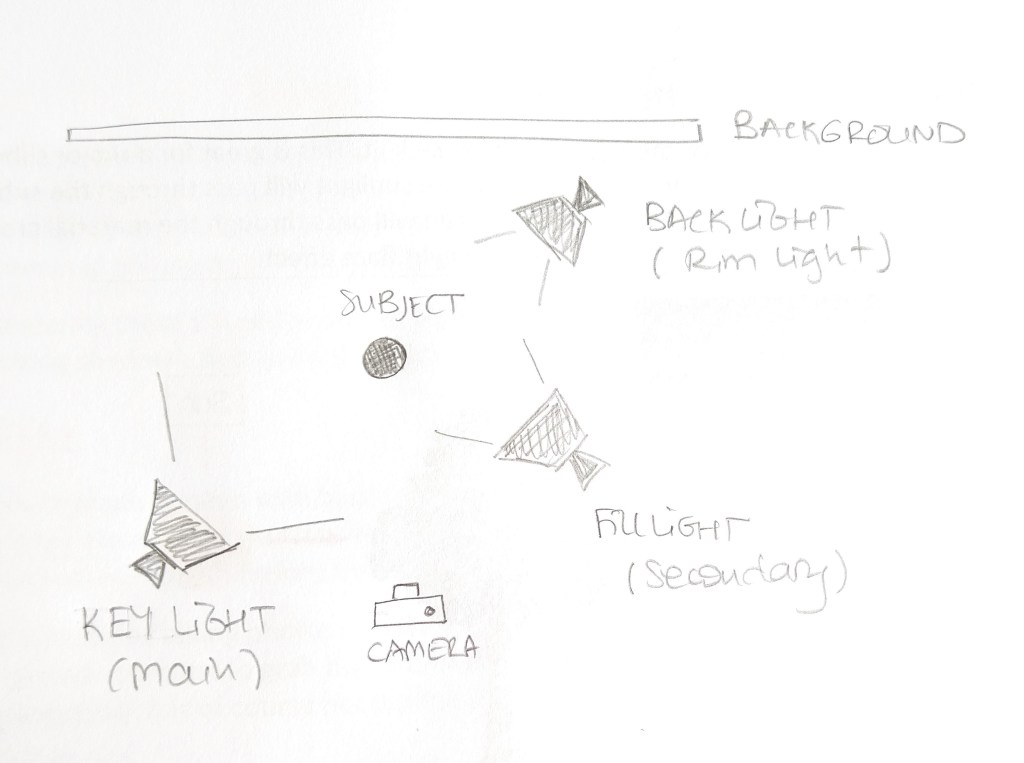
3 – Draw a diagram of and describe the three-point lighting setup.
3-point lighting setup
The key light is the main source of light that is positioned to light up the subject. It’s often the brightest light and plays a great role in determining where the highlight and shadow area in your photograph would be. It is usually placed at a 45º angle to the camera, slightly above the eye-level of the subject and angles down towards them.
The fill light can also be called the secondary light. It aims to “fill in” dark shadows and help soften their intensity. The filling light is placed on the opposite side of the camera to the key light, usually at a 45º angle and a bit lower than the main light source. It’s normally half as bright as the key light (or even less) and can be adjusted depending on how intense you want the shadows to be.
The back light, also called the rim light, is placed opposite the fill light or key light, behind the subject to create a “rim” around the subject, by highlighting their hair and shoulders and separate them from the background.
Question 2 – Research assignment
1 – Draw three studio setups for the following subject matters and list all the equipment that you would use to light your subjects:
Portrait
For a portrait photo I would use a 3-point lighting setup. A key light at a 45º angle a slightly above eye-level, a fill light in the opposite side at eye-level to avoid harsh shadows under the eyes and the chin. The main light is twice as bright as the secondary. Finally, and this is optional, I would add a back light to separate the subject from the background, in case it is needed.
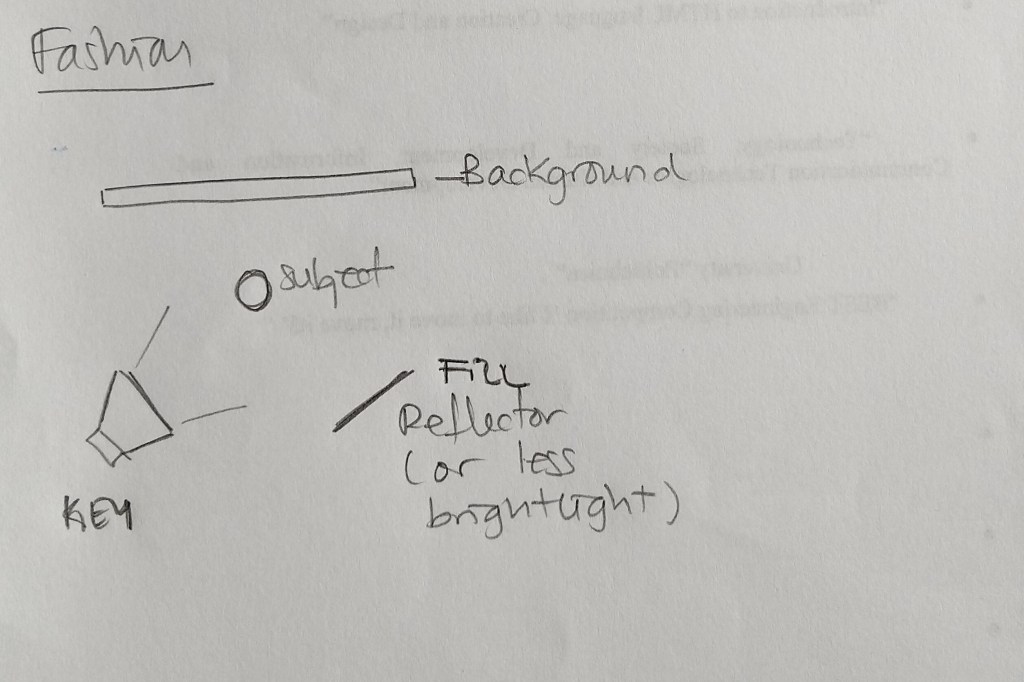
Fashion
In case of a fashion shooting, I would use a key light at 45º on one side of the model and a quite lighter light (8:1 or 4:1 ratio) or a reflector on the opposite side of the subject to fill in some of the shadows but keep some contrast.
Beauty
Beauty shots usually use front light to soften texture, wrinckles and skin imperfections. For that reason, I chose to have an umbrella reflecting the light right into the subject. This way, the light is soft and spreads nicely, illuminating both the subject and the background.
2 – In a magazine or on the Internet, find one fashion shot, a beauty shot and a portrait shot and explain how you think the lighting was set up in each shot.
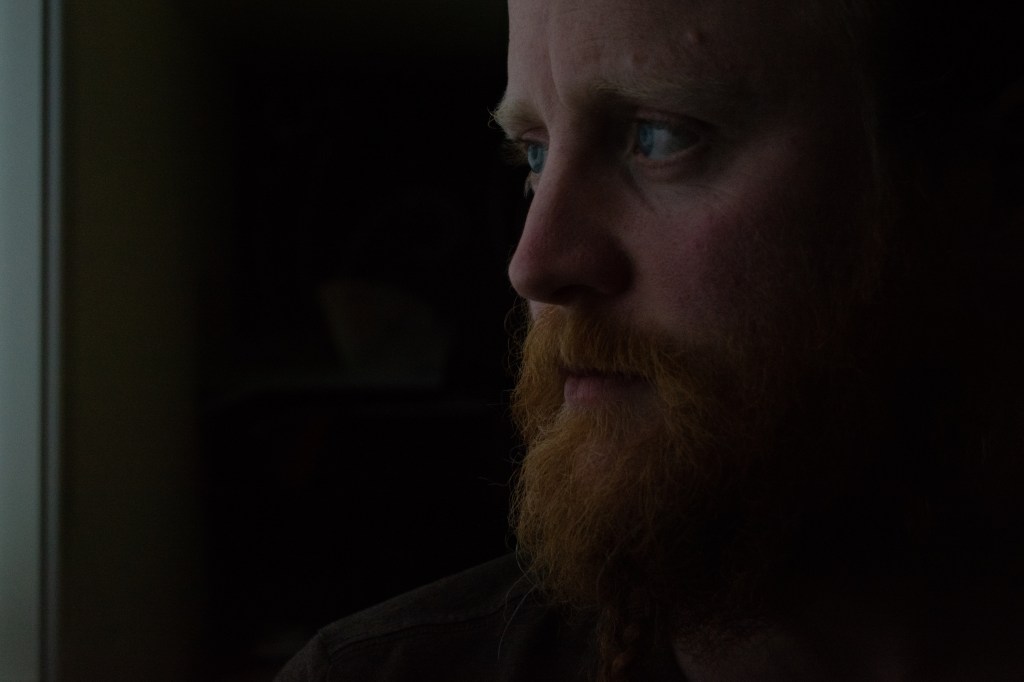
Portrait
For this shot I think the key light was located to the left of the subject, probably at 45º. To soften the shadows on his right side, there is probably a secondary light or a reflector. I don’t think there is a back light, as the white wall would acts as a reflector.
Fashion
Her shadow on the floor indicates there is a source of light coming from the model’s right side. There is probably a reflector to her left.
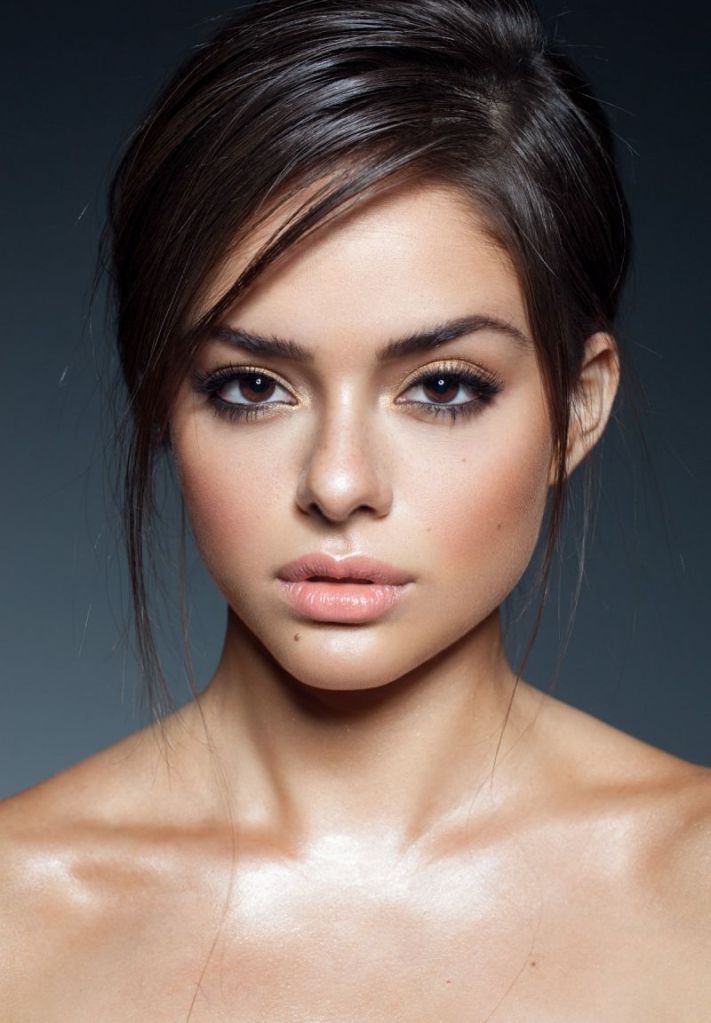
Beauty
The highlights on the model’s nose and chest suggest the light is placed right in front of her. I believe there is also a back light, that separates her from the dark background.
Question 3 – Practical assignment
Take some portrait shots and pay specific attention to the lighting you use. I would like to see a shot with soft lighting and one with more dramatic, harder lighting. It would be beneficial to hire studio lighting, but if you can’t, you may use natural light, reflectors and your camera’s flash.
Hard light
The sun is shining on the subject’s left side, creating harsh shadows on the right side of her face.
Soft light
In this case, the sun is entering the window in front of the subject, but the white blinds that are pulled down act as a diffuser and thus the light is soft.
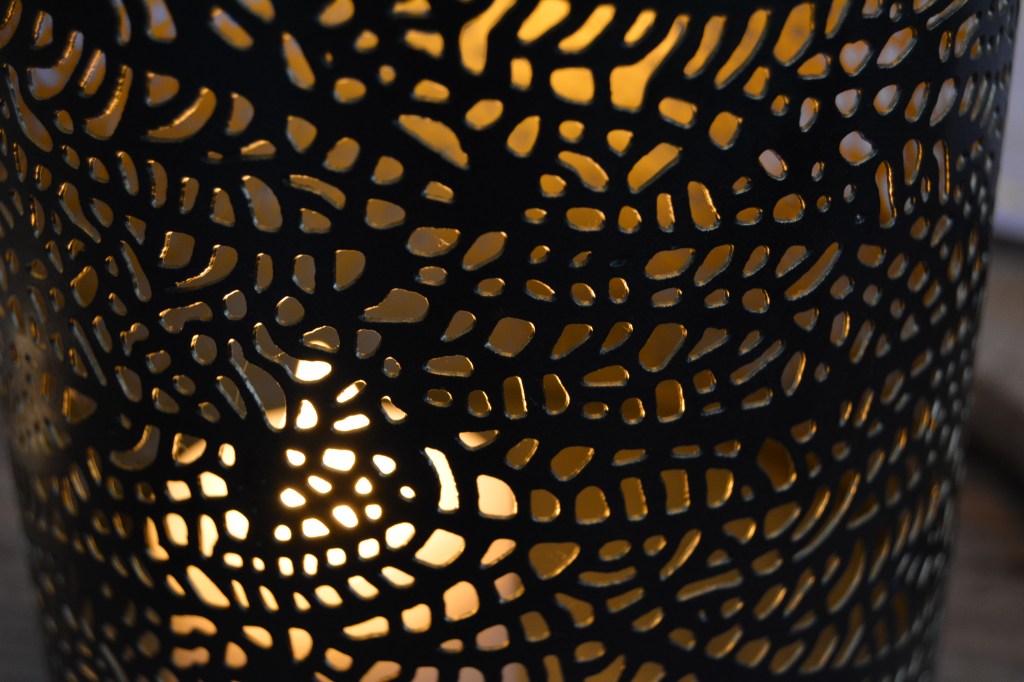
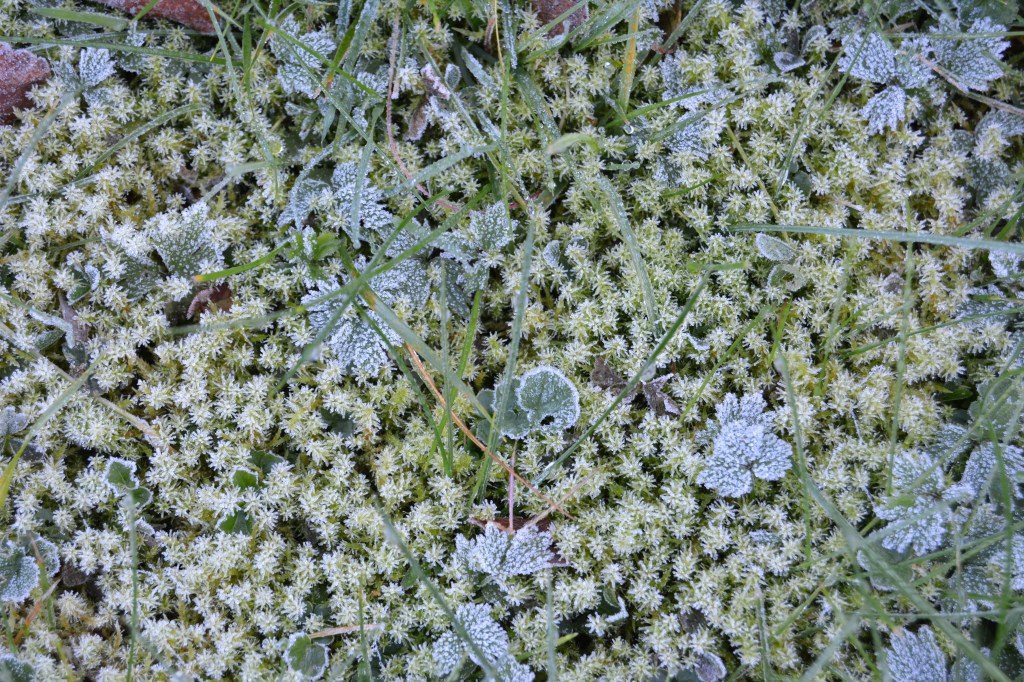
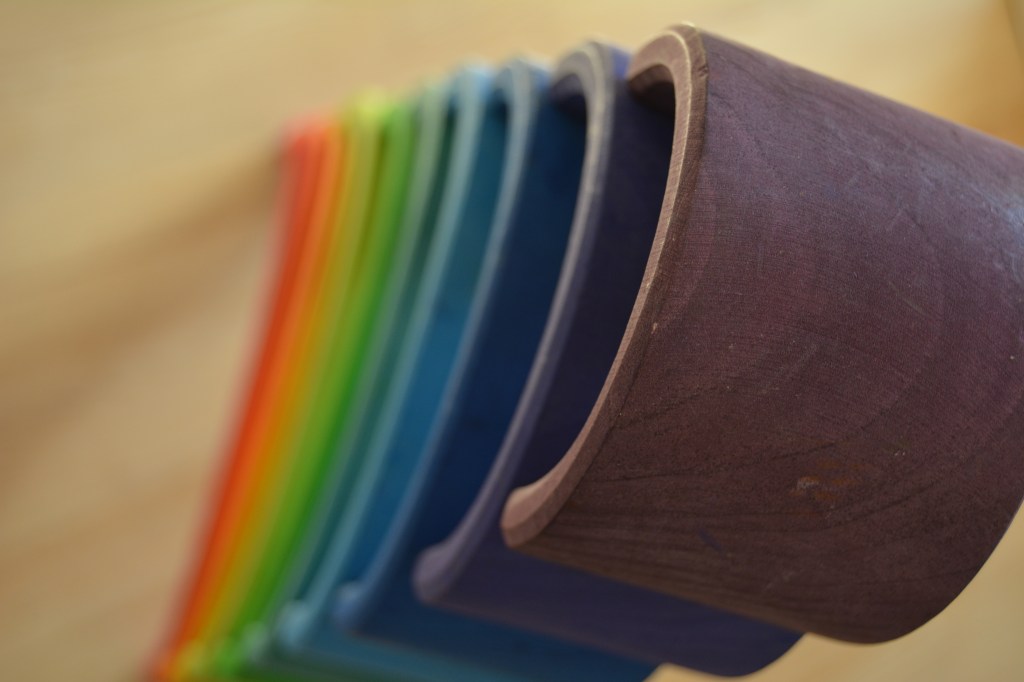
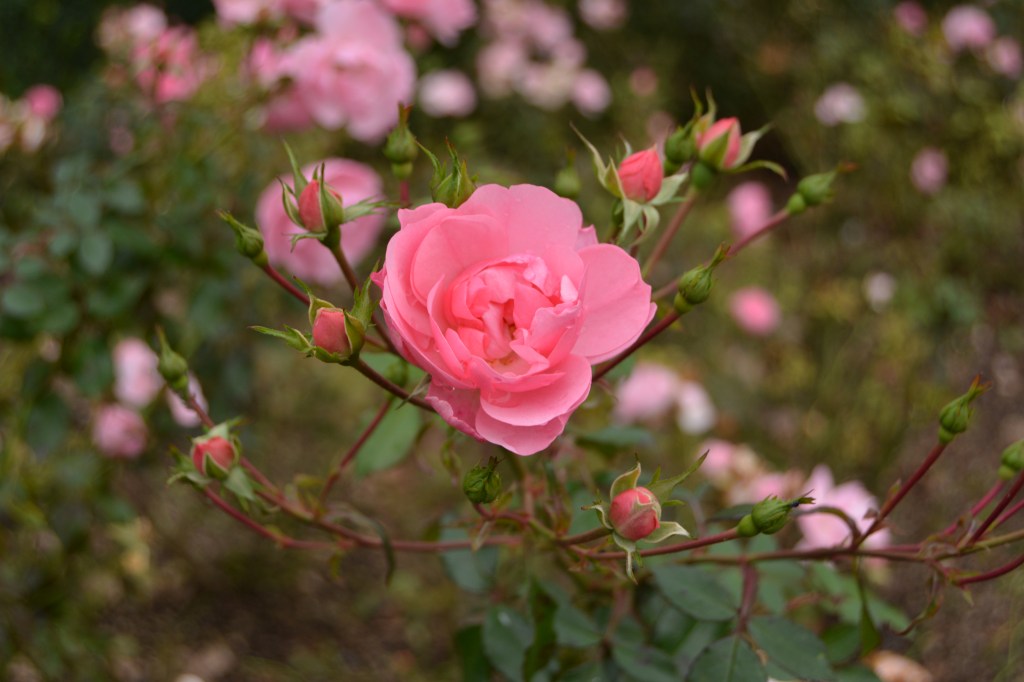
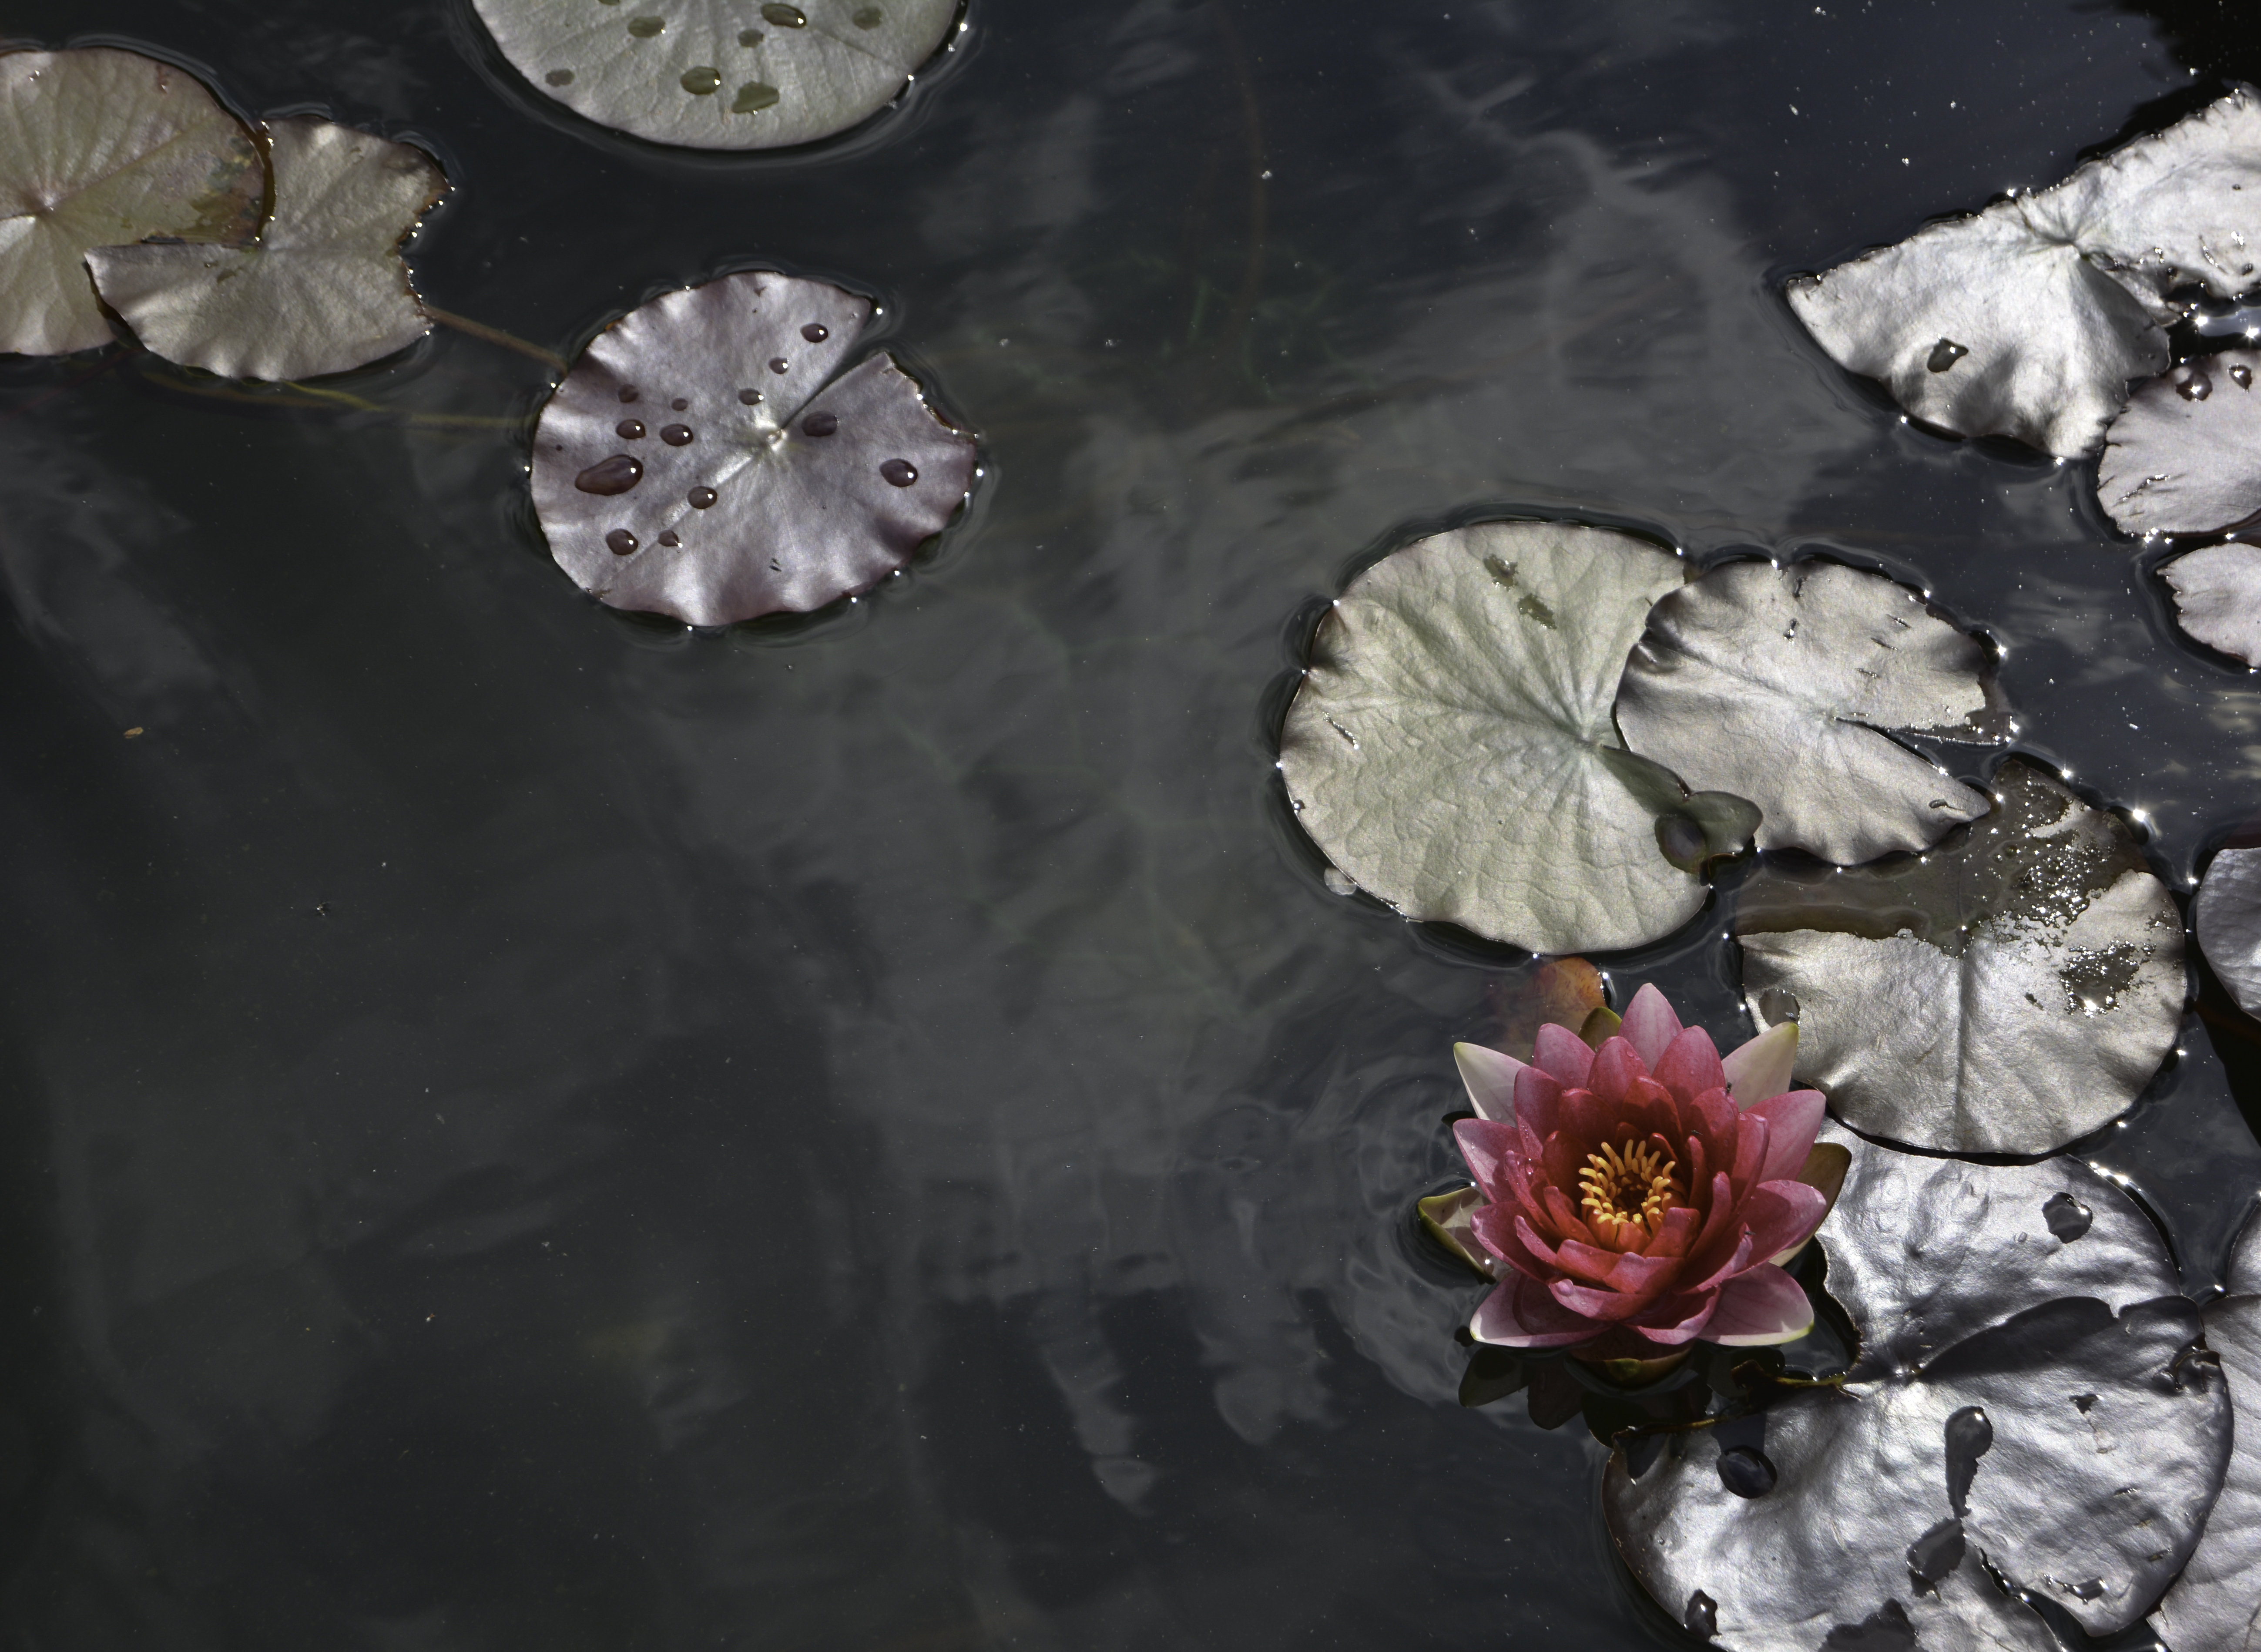
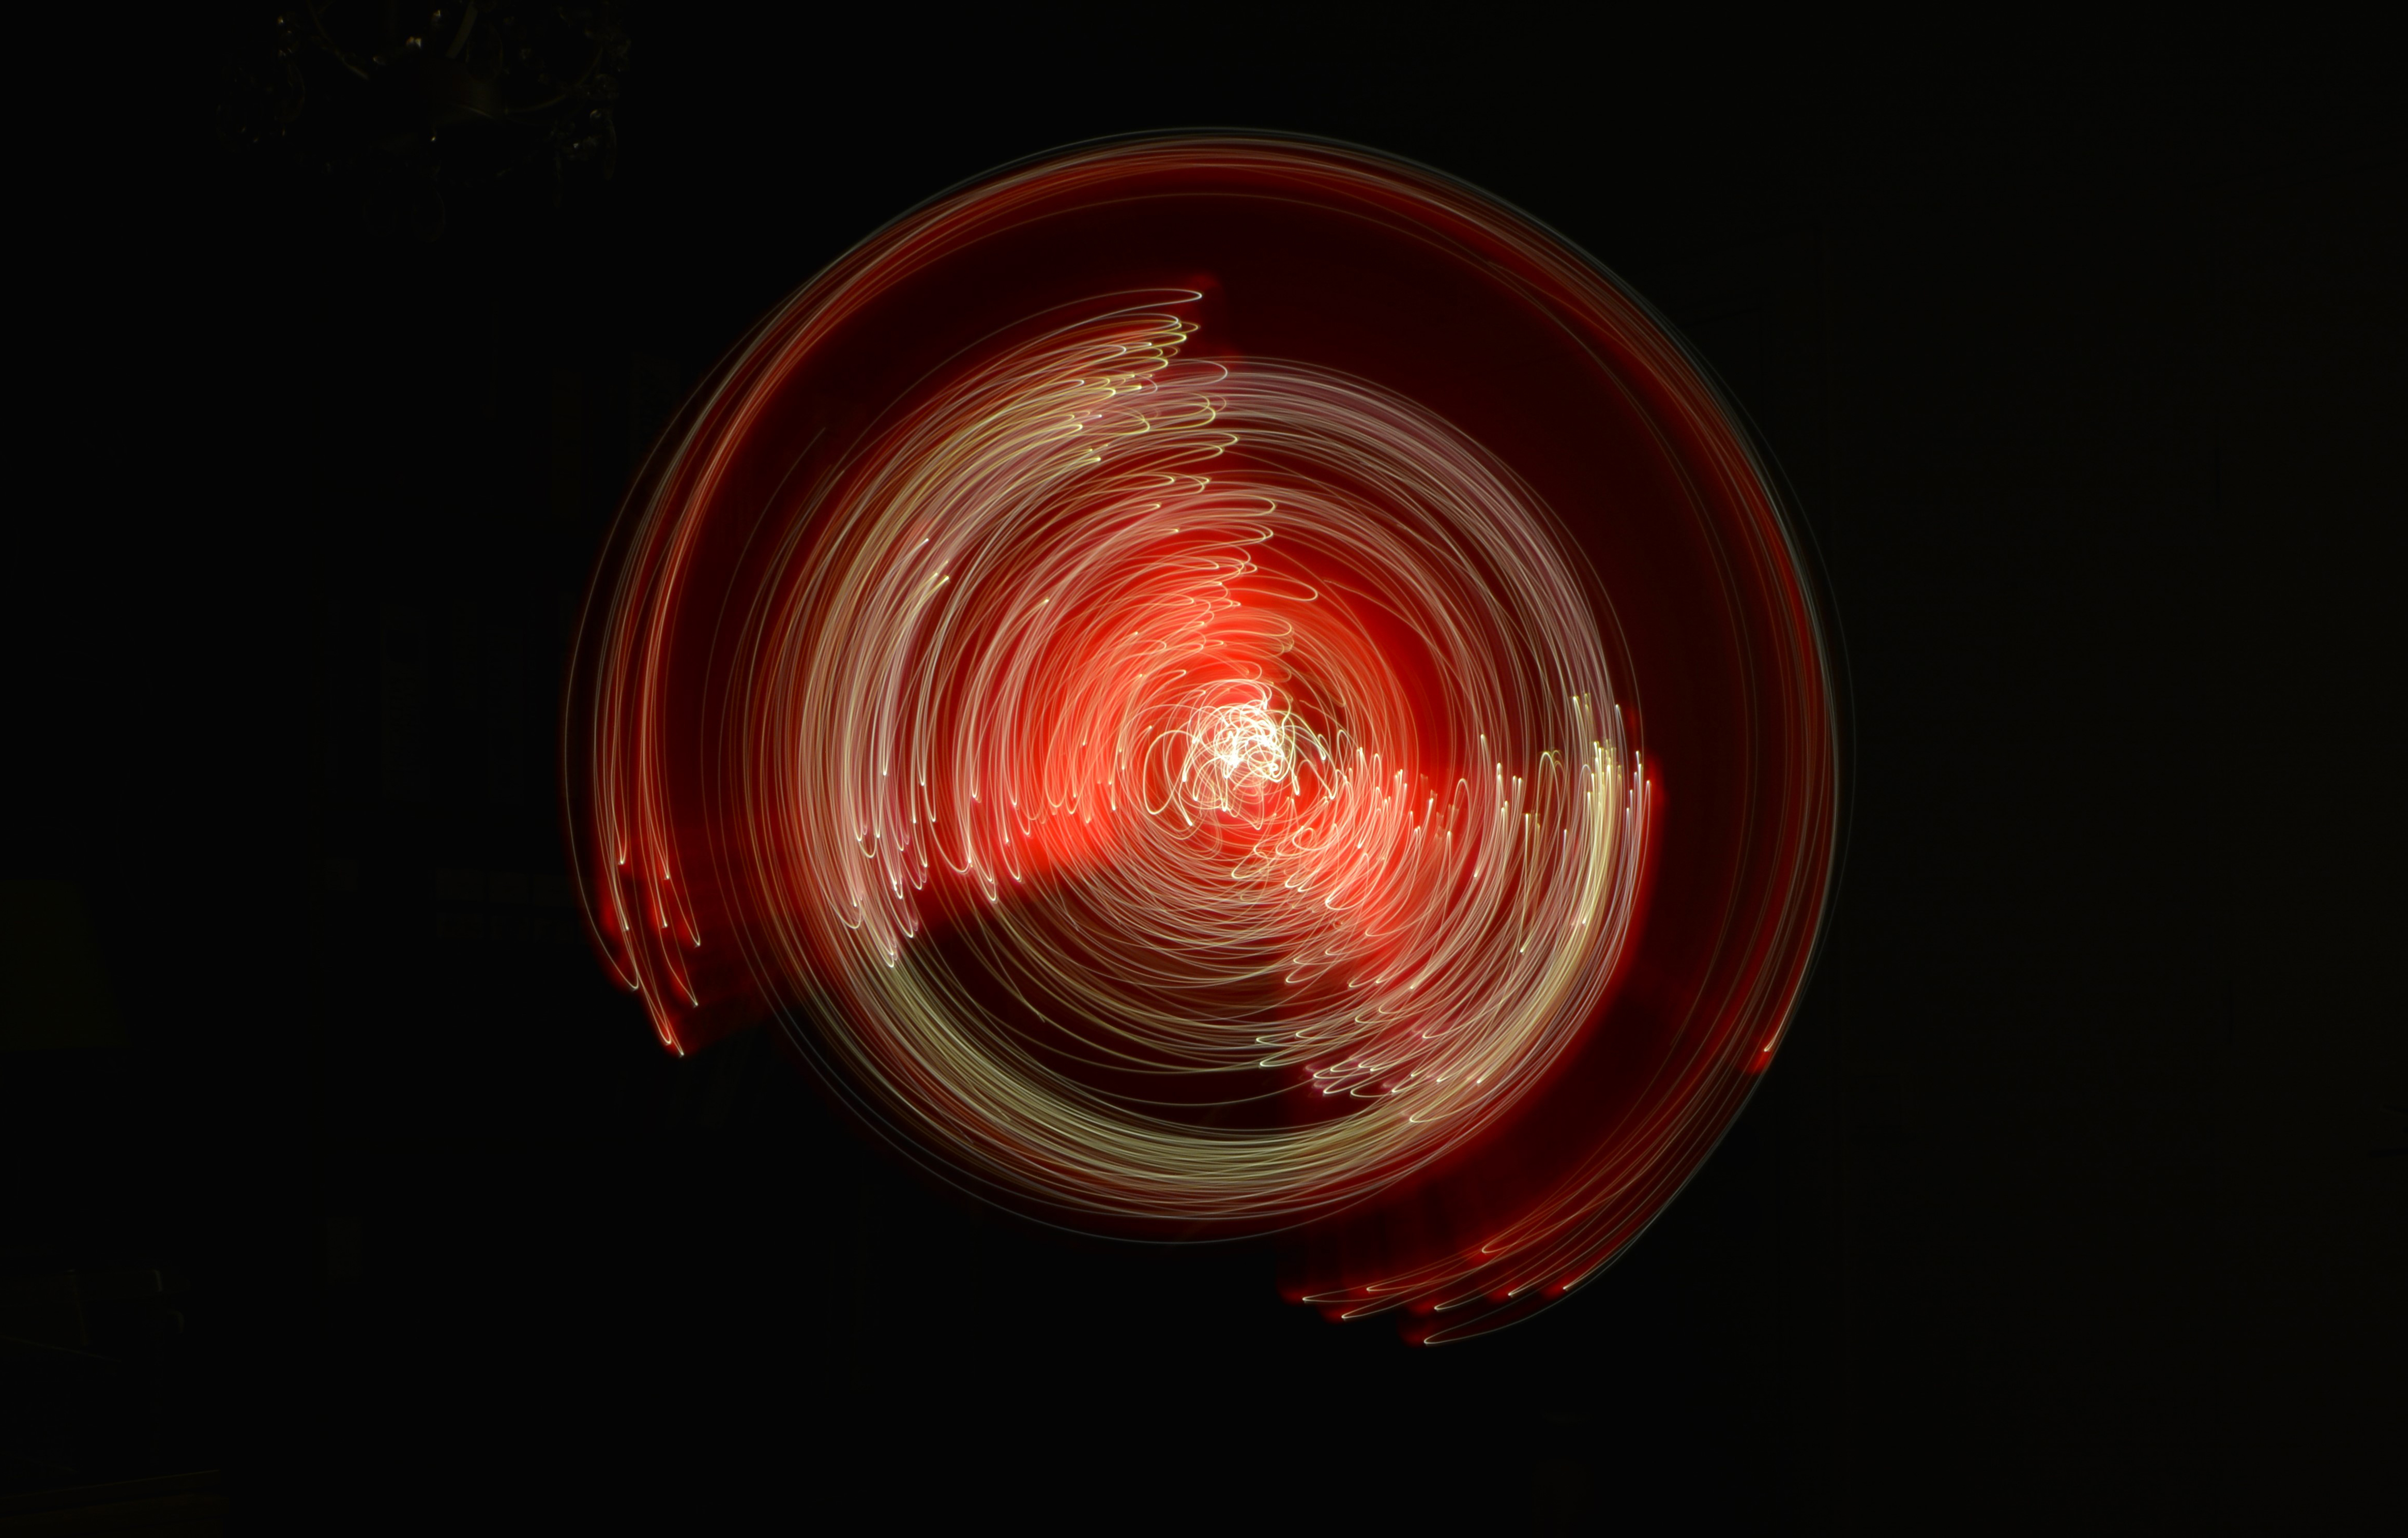
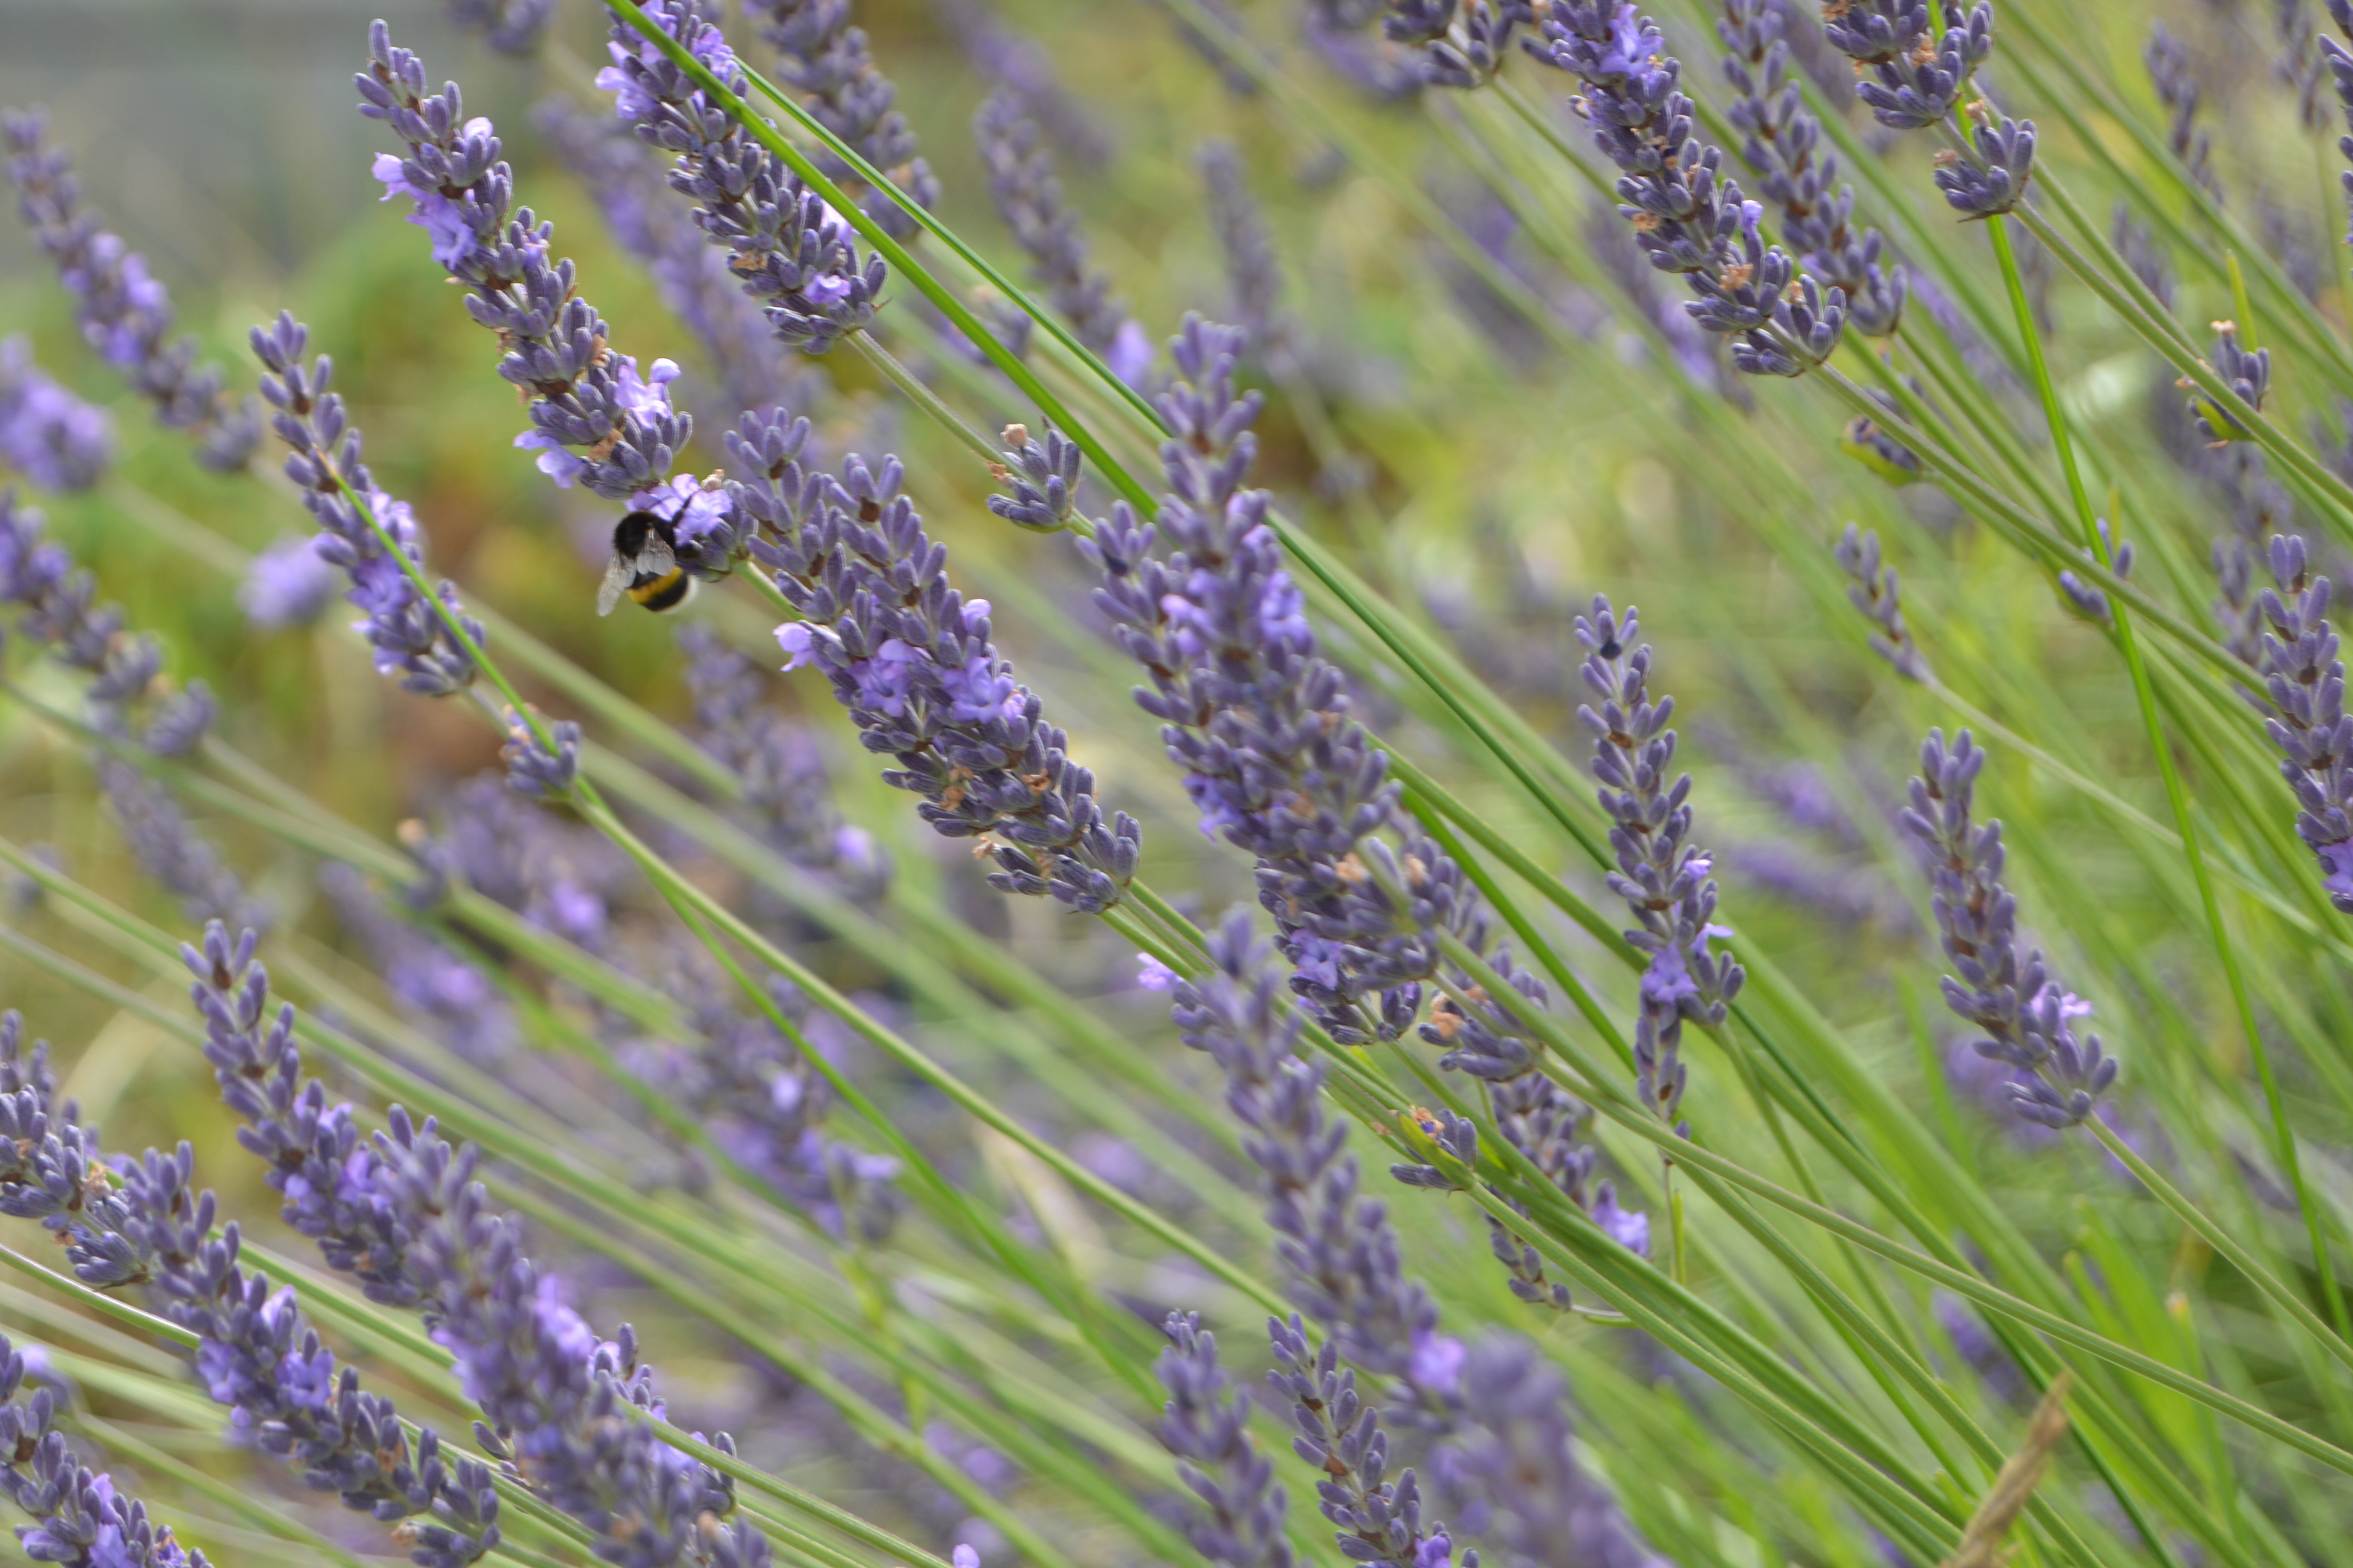
The purpose of this assignment was to experiment with photography throughout the semester and explore different topics and techniques. We had to shoot, at least, one image for each of the themes listed below and create a well-thought composition. The photos may be cropped, but not manipulated.
– Night Photo – Freeze water – “Misty / veil” – The golden section – Motion blur – Contrast – Low key or high key – Curves and lines – Drawing with Light – Depth
These are the 10 photos I picked for the assignment. I shot all of them with my Nikon D5200.
Pick three events in the timeline from this week’s lesson History of Photography: An Introduction, and find photographs of the event on the Internet or in the library and write a paragraph explaining the event in more detail. Include your photographs in the description.
The oldest surviving camera photograph
View from the Window at Le Gras is a heliographic image and the oldest surviving camera photograph. It was created by French inventor Nicéphore Niépce in 1826 or 1827 at Saint-Loup-de-Varennes, France, and shows parts of the buildings and surrounding countryside of his estate, Le Gras, as seen from a high window. Niépce captured the scene with a camera obscura focused onto a pewter plate thinly coated with Bitumen of Judea, a naturally occurring asphalt. The bitumen hardened in the brightly lit areas, but in the dimly lit areas it remained soluble and could be washed away with a mixture of oil of lavender and white petroleum. A very long exposure in the camera was required, traditionally said to be eight hours, but now believed to be several days.
View from the Window at Le Gras, 1826–1827 (manually enhanced version)
Close up of the original plate
Introduction of Daguerreotype
In 1839, Louis Jacques Mandé Daguerre publicly introduces his daguerreotype process, which produces highly detailed permanent photographs on silver-plated sheets of copper. At first, it requires several minutes of exposure in the camera, but later improvements reduce the exposure time to a few seconds. The daguerreotype was the first commercially successful photographic process in the history of photography. A great number of daguerreotypes, especially portraits, were made in the mid-19th century; the technique was supplanted by the wet collodion process.
Still life with plaster casts, made by Daguerre in 1837, the earliest reliably dated daguerreotype.
Daguerreotype camera built by La Maison Susse Frères in 1839
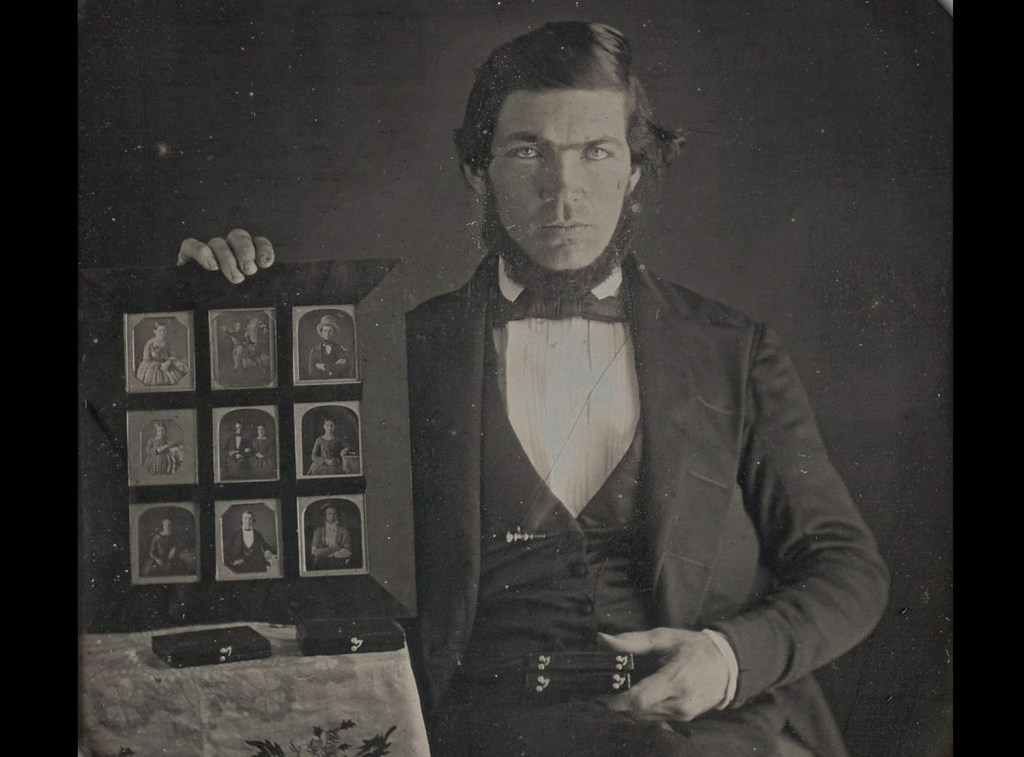
A formally dressed man displays nine different daguerreotypes in a display frame, one of the first known photographic advertisements, made in 1845
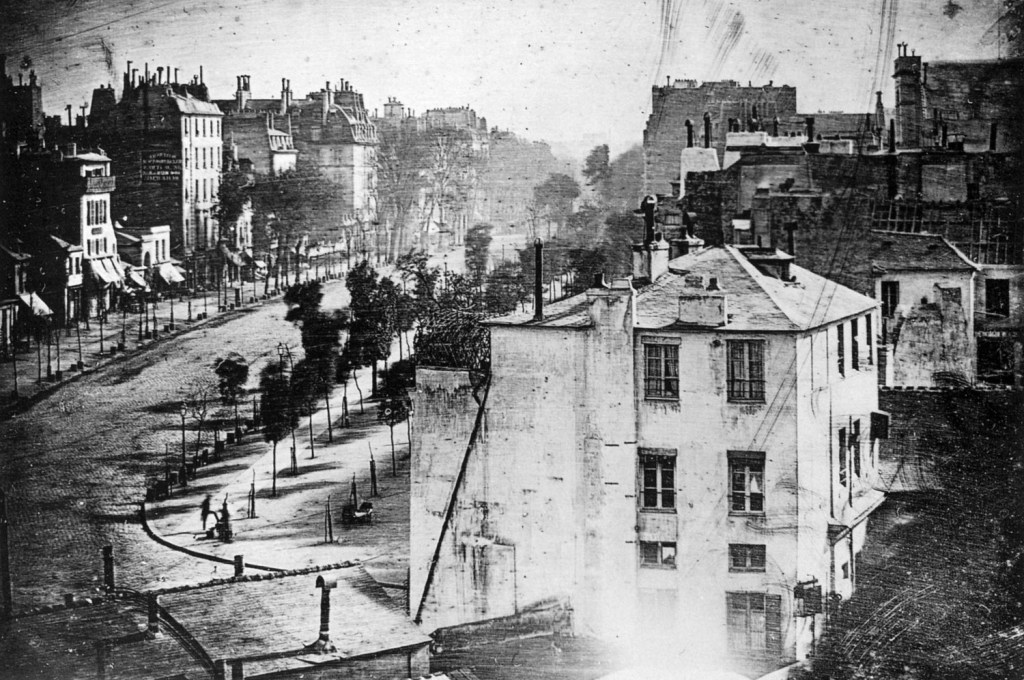
Boulevard du Temple, Paris, a street scene captured in a Daguerreotype in 1838 or 1839. Believed to be the earliest photograph showing a living person.
First photographically illustrated book to be commercially published
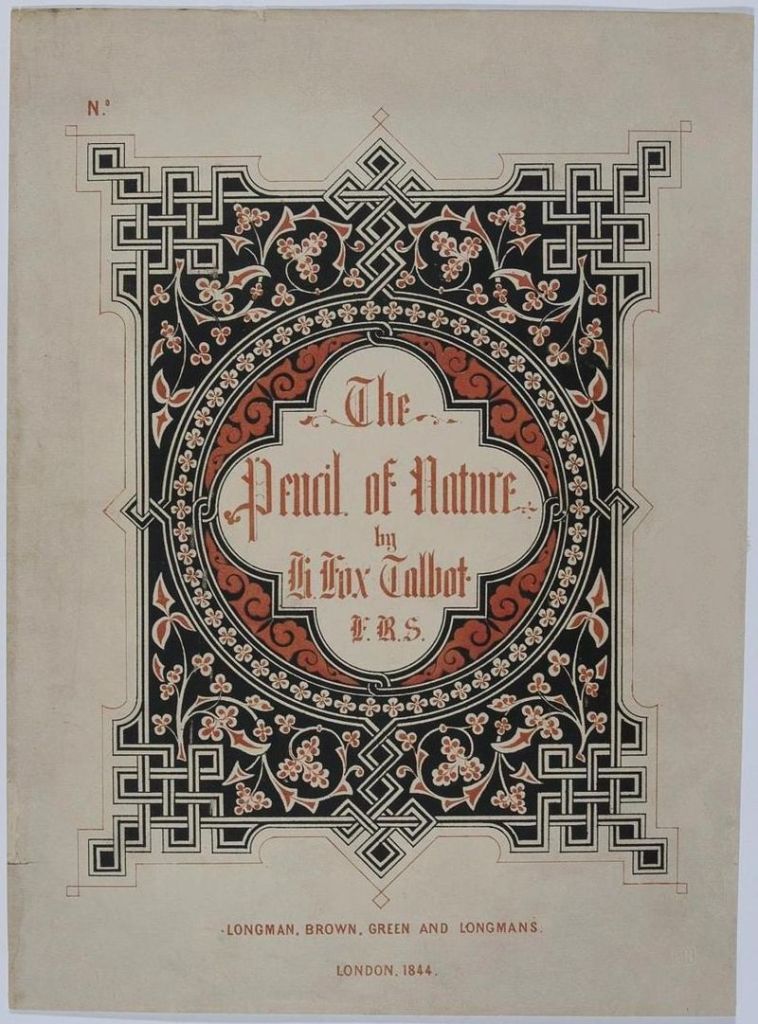
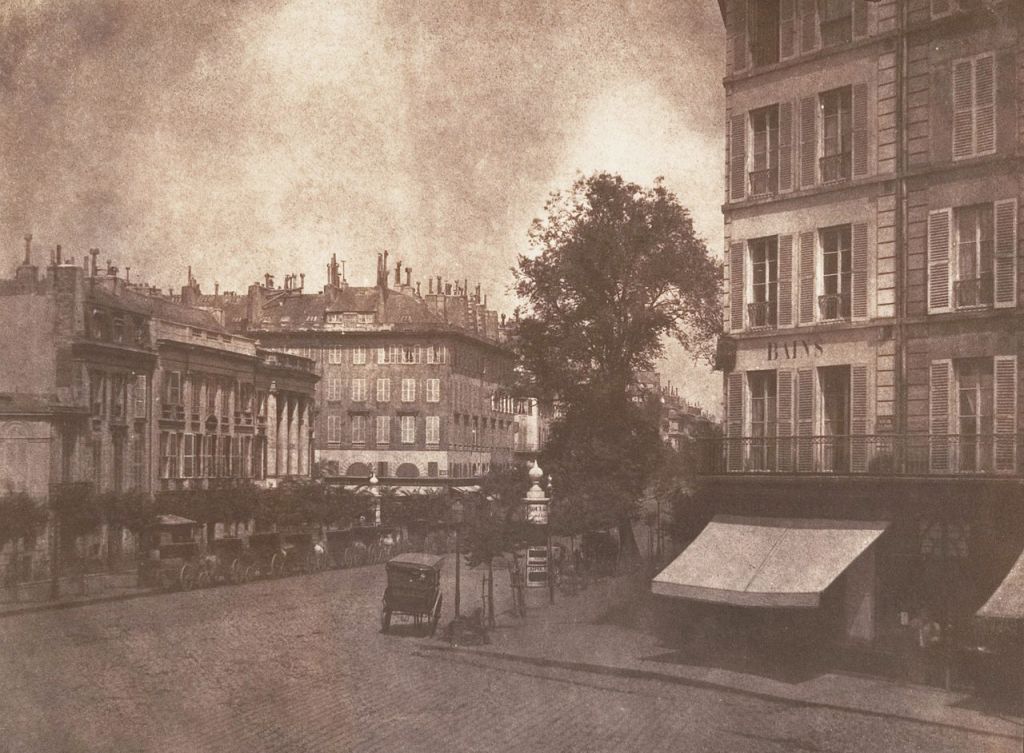
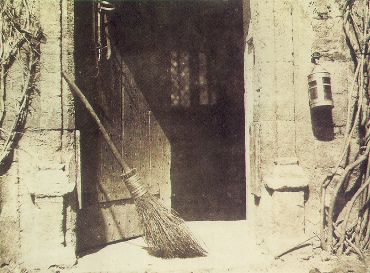
The Pencil of Nature (1844–46), written by William Henry Fox, was the first book with photographic illustrations. The book detailed Talbot’s development of the calotype process and included 24 calotype prints, each one pasted in by hand, illustrating some of the possible applications of the new technology. They include a variety of architectural studies, scenes, still-lifes, and closeups, as well as facsimiles of prints, sketches, and text. Due to the long exposure times involved, however, Talbot included only one portrait, The Ladder. Though he was no artist, Talbot also attempted to illustrate how photography could become a new form of art with images like The Open Door.
Cover of The Pencil of Nature, 1844
View of the Boulevards at Paris
The Open Door
The Ladder
Question 2
Throughout this lesson you’ve learnt about the various techniques used and inventors that contributed to the art form that is Photography. Choose only one, do some additional research and in your own words write a report on why you think the chosen technique contributed to what we are able to do today through photography.
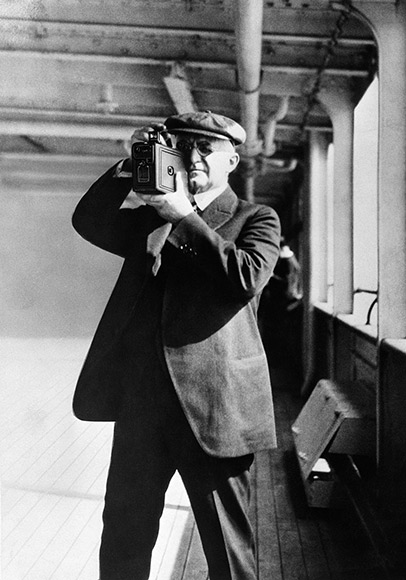
I grew up using a Kodak roll film camera. I remember the excitement of taking the roll to the shop to be developed and, a few days later, open the envelop and see all those pictures I took weeks (or months) prior. I was surprised to learn in this week’s lesson that this was already possible a century before, thanks to George Eastman’s invention of the roll film and the first Kodak camera.
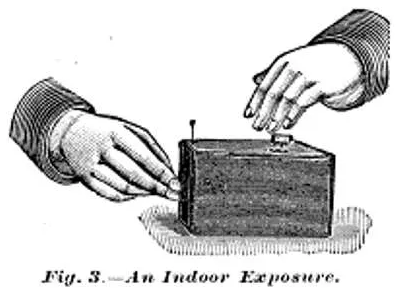
George Eastman takes pictures with his Kodak camera
Before that, photography was only available for the few who could afford it. The cameras and gear at the time were large, heavy and cumbersome, and the wet place processes used back then required the photographer to do the development. This added to the time, expense, and skill level needed to make a photograph. It was 1888 when the American entrepreneur invented a game-changing dry and flexible photographic film that came in a roll. Besides, the film was designed for use in Eastman’s newly designed, user-friendly Kodak cameras. This innovative camera and film combination represents a turning point in photography, when the industry began shifting from expensive, time-consuming processes enjoyed by the few, to cheaper and easier snapshots that can be done by the many.
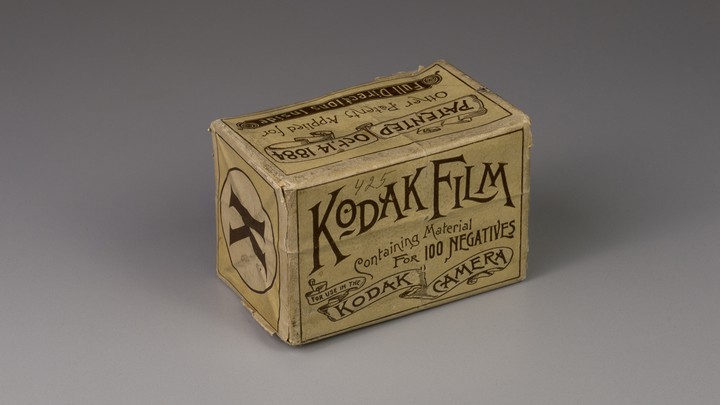
Kodak roll film
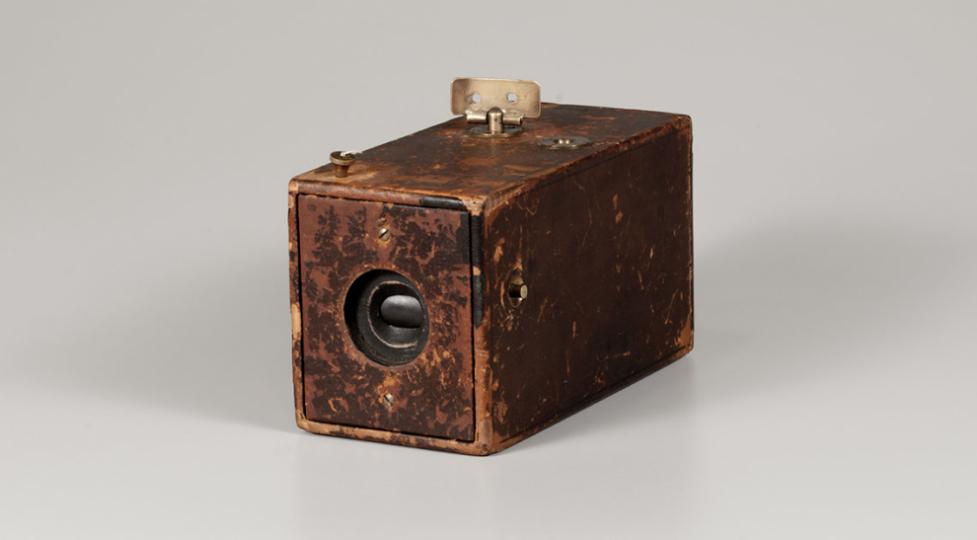
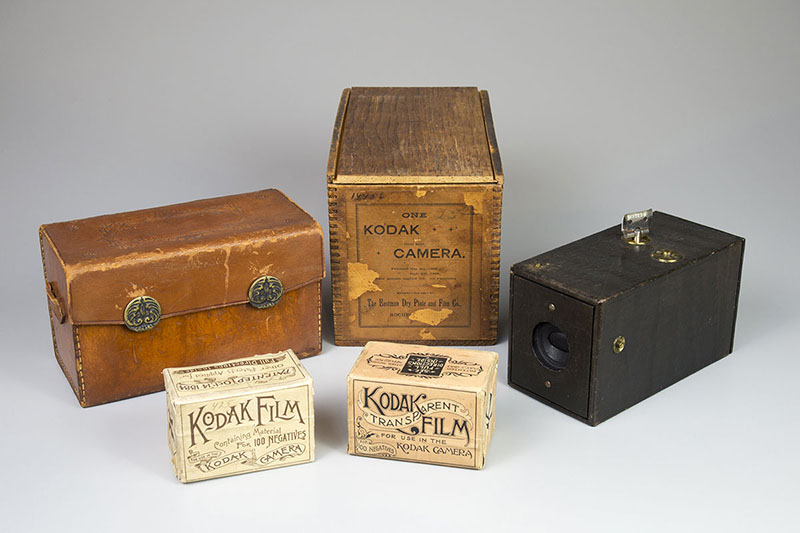
Kodak Camera, 1888
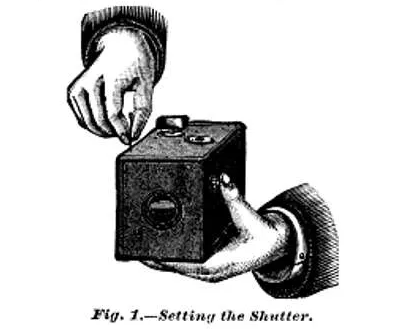
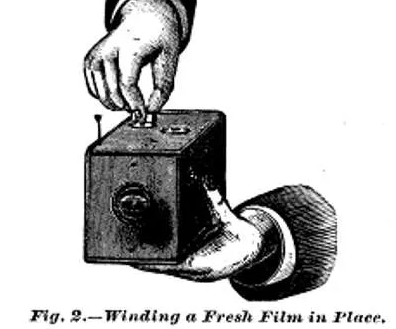
The Kodak camera was a box-style camera requiring no adjustments or prior photographic knowledge. To use the camera, the photographer simply armed the shutter by pulling up on the string (located on the front right of the camera), pointed the camera at the subject, and then pressed the shutter release. After taking a photograph, a key on top of the camera was used to wind the film onto the next frame. There is no viewfinder on the camera; instead, two V-shaped lines on the top of the camera leather are intended to aid aiming the camera at the subject. These steps were clearly explained in the camera’s instruction manual and were used to promote the ease of the camera along with the slogan, “You press the button, we do the rest”.
For $25 at the time (around $625 in today’s money), anyone could purchase the device, preloaded with enough film for 100 pictures. After finishing the roll, the camera could be sent to the Kodak factory for developing and printing at a cost of $10. The camera, loaded with a fresh roll of film, was returned with the negatives and mounted prints. Although the price was still high, the Kodak camera was accessible for far more people than before. Amateur photography grew significantly, which lead to an enormous demand for new rollable film.
Two rolls of film with a 1888 Kodak Camera, leather case and wooden box
It is difficult to imagine how photography would be today without the invention of the roll film or the Kodak camera at the end of the 19th century. Even though digital photography is the most popular choice nowadays, it is obvious the essential role film photography played in the development of modern photography. Besides that, and thanks to portable cameras such as the one created by George Eastman, we were able to document important events in history in a much easier and cheaper way than ever before.